If you’re looking for a stunning houseplant that will add an exotic flare to your indoor space, look no further than Alocasia Polly.
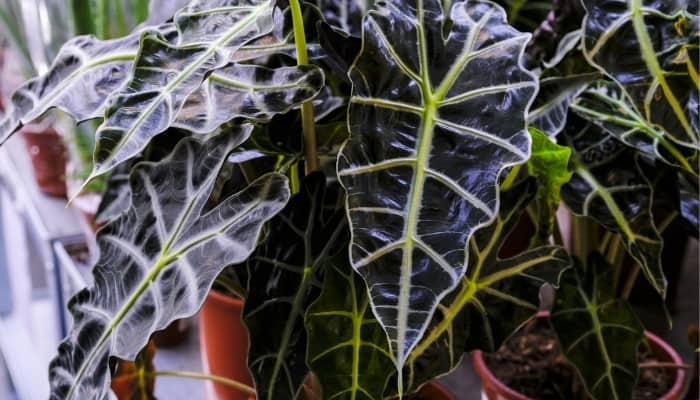
This plant is famous for its striking foliage, characterized by glossy, dark green leaves with prominent white veining.With its unique and eye-catching appearance, Alocasia Polly will surely be a conversation starter and a favorite among plant enthusiasts.
But beyond its striking looks, this plant is also relatively easy to care for, making it an excellent choice for experienced and novice plant parents. So, Alocasia Polly is a plant to consider whether you’re an avid collector or just looking for a statement piece to liven up your living space.
Alocasia Polly, also known as Elephant’s Ear or African Mask plant, is a gorgeous tropical plant that is gaining popularity for its stunning foliage. If you’re interested in growing this plant, it’s important to understand its growth stages so you can provide proper care. In this comprehensive guide, we’ll explore the different stages of Alocasia Polly plant growth and give tips for healthy growth
Overview of Alocasia Polly
Native to tropical Southeast Asia the Alocasia Polly is characterized by its large, arrowhead-shaped green leaves with prominent white veining. This striking foliage makes it a coveted houseplant.
Alocasias are tuberous, meaning they grow from a underground stem called a corm. They are perennials in warm climates but go dormant in winter when kept indoors. Although Alocasias produce flowers, they are primarily prized for their foliage.
Below we’ll break down the growth timeline of these stunning plants and provide care recommendations for each stage.
Alocasia Polly Growth Stages
1. Germination
Germination is the first stage of growth and occurs when the seed or corm sprouts.
-
Seeds take 1-2 months to germinate. Keep soil moist and provide warmth.
-
Corms sprout in 2-4 weeks. Plant corms just below soil with growing tip facing up.
-
Once sprouted, provide bright indirect light.
2. Seedling Stage
In this stage, the first true leaves emerge and roots establish.
-
Leaves are vulnerable to direct light, provide bright indirect sunlight.
-
Keep soil moist but not soggy. Water when top inch is dry.
-
Maintain warm temps around 70°F – 80°F.
-
Consider dilute fertilizer to nourish growth.
3. Vegetative Growth
Now the plant puts energy into leaf and root development.
-
Increase light exposure gradually. Provide 4-6 hours of direct morning sun.
-
Allow soil to partially dry out between waterings.
-
Humidity around 60% prevents leaf tips from browning.
-
Apply balanced liquid fertilizer every 2-3 weeks during growing season.
4. Maturation
In this stage, the plant reaches its mature size and produces flowers/offsets.
-
Alocasias reach 1-4 feet tall depending on variety.
-
Flowers resemble pale green/cream calla lilies. Not common indoors.
-
Plants may produce offsets (pups) from the corms. These can be removed and propagated.
-
Reduce water and fertilizer entering dormancy.
5. Dormancy
When light and temps drop in fall/winter, plants become dormant.
-
Growth slows or stops. Leaves may yellow and drop.
-
Reduce watering but don’t let plant dry out completely.
-
Discontinue fertilizer.
-
50°F – 65°F temps are ideal.
-
Keep in bright, indirect light.
Caring for Alocasia Polly
Caring for Alocasia Polly properly during each growth stage is key to preventing issues and keeping it thriving. Here are some top care tips:
-
Light – Bright, indirect sunlight. Some early morning sun.
-
Water – Allow soil to partially dry out between waterings.
-
Humidity – Prefers 60% or higher. Mist leaves or use a humidifier.
-
Temperature – Ideal range is 70°F – 80°F.
-
Fertilizer – Use a balanced houseplant fertilizer at half strength every 2-3 weeks in growing season.
-
Potting – Well-draining aroid mix. Terracotta pots provide air circulation. Re-pot every 2 years.
-
Pests – Watch for spider mites and treat with insecticidal soap. Prevent by keeping humidity high.
Propagating Alocasia Polly
These plants propagate easily through offsets from the corms. Simply separate the offsets with a sterile knife and pot in aroid mix. Keep warm and moist until established. Seeds can also be cultivated but take much longer.
Common Problems
Here are some common Alocasia Polly problems and solutions:
-
Drooping leaves – Underwatering. Allow soil to partially dry before watering.
-
Yellow leaves – Overwatering or insufficient light. Adjust watering and provide more sunny location.
-
Leaf tips browning – Low humidity. Increase humidity levels around plant.
-
Leggy growth – Insufficient light. Provide more light exposure.
With its tropical look, Alocasia Polly makes a striking addition to any home. By understanding the various stages of growth your plant will go through and providing the proper care during each phase, you can keep your Alocasia Polly healthy and thriving for years to come. Pay close attention to its light, water, humidity, and fertilization needs throughout the seasons and you’ll be rewarded with gorgeous, vibrant foliage.
What’s an Alocasia Polly?
This unique elephant ear plant was developed as a smaller version of its parent, Alocasia x amazonica ‘Polly’ (assumed scientific name). Alocasia x amazonica is a hybrid produced by cross-breeding two other Alocasia species: Alocasia watsoniana and Alocasia sanderiana.
Alocasias are members of the Aroid family and native to different parts of Asia but can also be found in Indonesia, the Philippines, Malaysia, and Australia.
Although its name suggests otherwise, neither Alocasia variety originates from the Amazon rainforest. Alocasia Polly was artificially created, although its ‘ancestors’ can be naturally found in Asian rainforests.
Two common names for the Alocasia Polly are African Mask Plant and Amazonian Elephant’s Ear, and ironically, its roots are in another continent. Alocasia Polly’s ‘parents’ are native to China, the Philippines, and Southeast Asia.
This unique cultivar was created in the 1950s by Salvadore Mauro, a Florida developer and greenhouse grower who owned the former Amazon Nursery.
The boldly patterned and dark green leaves of the Alocasia Polly plants make it stand out from a regular alocasia or other regular houseplants.
But, at the same time, its small size means that even in limited spaces, you can find room to grow your own Alocasia Polly.
This elephant ear plant also helps clear the air from harmful chemicals like formaldehyde.
The care guidelines for Alocasia Polly plants are a little more critical than others. Alocasia Polly is a pretty fussy plant and will go into hibernation mode or die off if its care is lacking anywhere.
Adequate care of this plant entails supplying this tropical plant with rainforest-like conditions. This plant care essentially involves bright indirect light, warm and humid environment, and consistently moist soil.
Imitating rainforest conditions for Alocasia varieties is crucial. Finding the right location, light, temperature, and humidity can be challenging.
The ideal location for this plant is in a greenhouse where temperature and humidity can be controlled. But luckily, this plant can also thrive inside your home with extra care.
One of the most important factors to keep your Alocasia plant happy is humidity; luckily, there are other ways to ensure the moisture in the air is enough for your plant, like placing it in the bathroom or the kitchen or keeping it near a humidifier.
When found in the rainforest, Alocasia plants grow under canopy trees. While the tropical sun is bright and hot, the trees filter it out for the plants. When you have an Alocasia Polly at home, the light requirements are bright, indirect sunlight. These lighting needs can be met by placing your plant directly in a north or east facing window where it will receive the soft morning light instead of harsh direct light.
If all you have is west or south exposure, find a place out of the full sun because direct sunlight can burn or bleach the plant’s leaves. A sheer curtain can help block the harshest rays if needed. If you move your plant to a higher-light location, be sure to acclimate it carefully.
Wipe your plant’s leaves occasionally with a soft cloth to remove dust and help your Alocasia Polly soak as much light as possible.
This plant is slightly demanding with its water needs. Alocasia Polly enjoys consistently moist soil (but not soaking wet). Alocasia Polly plants thrive in the rainforest’s damp soil, which is never saturated. Your Alocasia watering routine needs to maintain the same moist consistency.
Water your tropical plant whenever the top inch of the soil is dry by gently moistening the top layer. Never let your Alocasia sit in water; it cause the roots to need air, and overwatering your plant can cause root rot.
As tropical plants, they need to have their soil consistently damp but not soaking wet. The best way to know when to water your plant again is to put your finger into the top inch of the soil, and if it feels dry, water thoroughly until you see excess water coming out of the pot’s drainage hole.
Alocasia plants can be sensitive to chlorine found in tap water. So you may wanna use distilled water instead or let the tap water sit for several hours before using it.
As mentioned before, the air around this tropical plant should stay quite humid.
Like all tropical houseplants, Alocasia Polly plants can struggle, especially during Winter.
To combat this, you can spray your plants regularly or use a humidity pebble tray and a layer of water, but a humid setting is the best way to keep your plant happy and healthy.
One of the best options is to run a humidifier or group plants together to create a mini rainforest setting using an old aquarium, a greenhouse cabinet, or a humidity box and keep it on a high humidity setting.
Alocasia Polly plants should always be kept moist, but as with almost all plant species, the soil should not be soaking wet as root rot and other problems can become an issue.
Plant roots especially need well-draining soil and plenty of air pockets.
You can always buy Aroid soil mix for your Alocasia ‘Polly’, but it’s also easy to make yourself (many houseplants appreciate these airy and potting soil-free mixes).
Combine 1 part of perlite, five parts of orchid bark, and 1 part of sphagnum moss for a basic Aroid mix.
If you have a lot of greenery, DIY-ing can cut costs. Also, an easy draining soil with lots of coco coir will help keep the plant’s balance.
The Alocasia Polly plant blooms all year round as it uses a lot of energy to grow quickly.
If you want to keep up with your plant’s growth, you need to fertilize it once per month during its growing period in spring and summer; and once per quarter in fall and Winter, except when the plant goes into dormancy.
The best way to fertilize Alocasia Polly plants is by using liquid fertilizer or fertilizing sticks (stick to the package instructions). When you use these types of fertilizers, you won’t have to fertilize your plants as often as stated before, and you can stick to 3-4 times per year.
Fertilizing your Alocasia Polly will encourage the strong and healthy growth of its arrowhead-shaped leaves.
If your plant has problems like pests or root rot, DO NOT fertilize it. Fertilizing a damaged plant will put it in a more stressful situation.
Once your plant recovers, you can continue with your normal care routine.
This plant’s propagation is usually done by root division, as stem cuttings won’t work –unlike other plants. However, it’s really easy to propagate this tropical plant when you repot it every two years or so.
First, pull the root ball out of the pot, and shake off most of the soil (or as much as possible). After this, you should be able to see a tangle of corms twisted together; gently tug them apart – you can cut them if necessary.
Alocasia Polly’s common problems
As mentioned before, Alocasia Polly can be difficult to grow, but most of this plant’s problems can be avoided with proper care. Use your plant’s leaves to indicate potential issues.
If you notice your Alocasia Polly’s leaves are curling up, it’s more likely that your plant is getting too much direct light and/or too little humidity. Change one variable at a time to spot the source of the issue.
Alocasia Polly Plant Care Tips | Alocasia Amazonica Full Care Guide
FAQ
How long does it take for Alocasia Polly to grow?
How do I get my Alocasia Polly to grow more leaves?
Does Alocasia Polly like to be root bound?
What does an underwatered Alocasia polly look like?
Why is my Alocasia Polly not growing?
If your Alocasia Polly is not growing as fast as you would like, it may be a sign that the plant is not getting enough nutrients. To fix this, you can fertilize the plant with a slow-release fertilizer or a water-soluble fertilizer. Stunted growth can also be a result of the plant’s pot being too small.
Does Alocasia Polly go into hibernation?
Alocasia Polly is a pretty fussy plant and will go into hibernation mode or die off if its care is lacking anywhere. Adequate care of this plant entails supplying this tropical plant with rainforest-like conditions. This plant care essentially involves bright indirect light, warm and humid environment, and consistently moist soil.
Can Alocasia Polly be propagated by division?
If your healthy alocasia Polly is growing from at least two bulbs with two leaves, you can propagate the plant by division. If you have a mature plant that’s beginning to crowd its pot, division is a great solution. The best time to propagate alocasia Polly is during the spring and summer when the plant is actively growing.
Is Alocasia Polly a good plant for beginners?
Like other Alocasias, the Alocasia Polly is a tropical plant that has very particular needs and might not be the best plant for beginners. However, when you learn to take care of an Alocasia Polly, you’ll be able to take care of other, more advanced plants as well.