Up potting seedlings is an essential task for any gardener growing plants from seed. As seedlings outgrow their small starter pots and cells, they need to be moved into progressively larger containers to allow their roots ample room to expand. Learning how and when to up pot your seedlings will ensure they grow to be strong, healthy transplants ready for the garden.
In this complete guide, we will cover everything you need to know about up potting, including:
What is Up Potting?
Up potting simply refers to transplanting your seedlings into larger pots or containers. Also called “potting on” or “potting up”, this task involves gently removing seedlings from their current pots and replanting them in new, bigger pots with fresh growing medium.
As seedlings grow, their roots quickly fill up and become constrained within small starter cells or pots Up potting gives them more space for root development It also provides nutrients from fresh soil or potting mix.
When to Up Pot Seedlings
Timing is important when it comes to up potting. You want to repot seedlings before they become root bound but not too early when roots are still poorly established. Here are some signs it’s time to size up your seedling’s pots
- Roots are visibly circling the bottom of the pot.
- Roots are growing out of drainage holes.
- Growth seems slowed or stunted.
- Lower leaves look yellowed or nutrient deficient.
- Seedlings appear crowded and ready for more space.
As a general guideline, most seedlings will need up potting 4-6 weeks after sprouting. Fast growers like tomatoes may need repotting even sooner
It’s better to up pot a bit early than to wait too long. Severely root bound plants risk permanent stunting or transplant shock.
How Often to Up Pot Seedlings
Most seedlings will need up potting 1-2 times before their final move to the garden. Here are some typical potting up sequences:
- Seed starting cells or trays → 3-4 inch pots → 1 gallon pots
- 2-3 inch starter pots → 1 gallon pots
- 4 inch pots → 1 gallon pots
Larger veggies like tomatoes, peppers, and eggplant usually need an extra up potting. Fast growing warm season annuals like squash and cucumbers may only need one.
As a rule of thumb, increase container size by 2-3 inches with each successive up potting. Jumping more than 3 inches risks overwatering issues.
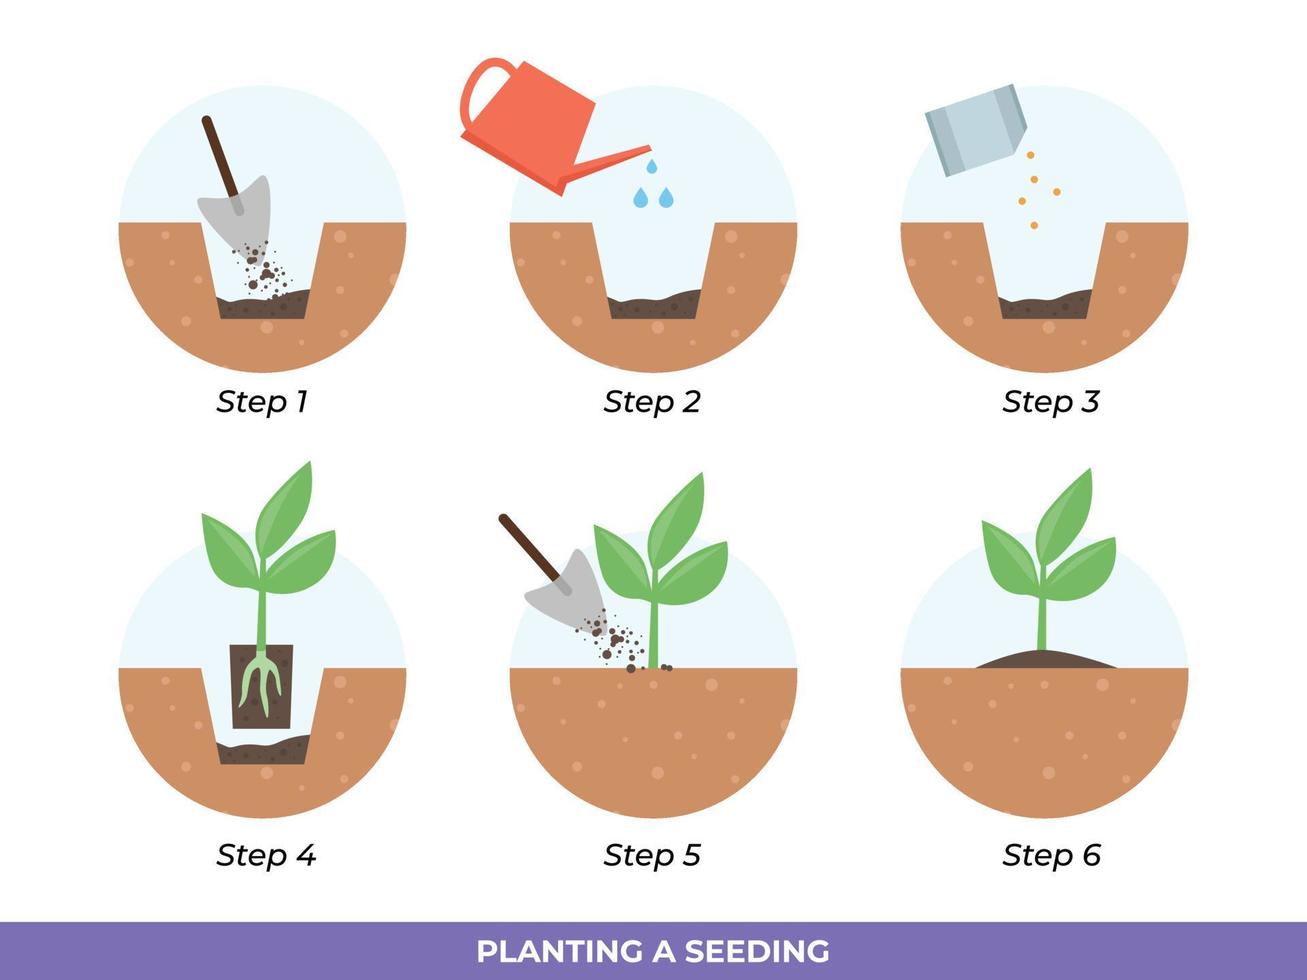
How to Up Pot Seedlings Step-By-Step
Follow these simple steps for transplanting seedlings smoothly:
1. Choose New Containers
Select pots or cell packs around 2-3 inches larger than the seedling’s current home. Avoid oversized containers, as smaller plants struggle to establish in too much soil.
For indoor seedlings, choose pots with drainage holes. Popular options include plastic nursery pots, peat pots, and biodegradable fiber pots.
2. Prepare Fresh Growing Medium
Avoid reusing old potting mix, as it likely contains depleted nutrients and accumulated salts. Mix a fresh batch instead.
For indoor seedlings, use a lightweight seed starting or potting mix. Outdoors, you can use multipurpose potting mixes.
Moisten the medium before potting so it’s damp but not soggy wet.
3. Water Seedlings Before Repotting
Water your seedlings well 1-2 hours before up potting. This will help keep the root ball intact when you transplant.
4. Remove Seedlings from Old Pots
Hold the base of the stem between your fingers. Turn the pot upside down, gently tapping the rim to loosen the root ball. Carefully slide out the seedling.
Alternatively, you can dump and gently tease the root ball out, or slide a butter knife around the edges to dislodge.
Be gentle, as you don’t want to disturb roots. Some tangling is normal, but untangle overly knotted roots before repotting.
5. Transplant Into New Containers
Make a hole in the new potting mix using your fingers or a trowel. It should be about 1 inch wider and deeper than the root ball.
Place the seedling inside and backfill soil around the roots and stem. Firm the soil gently but don’t pack it down hard.
Leave about 1⁄2 inch between the mix and the container rim. For leggy seedlings, you can bury some of the stem to promote rooting.
Water thoroughly after transplanting to remove any air pockets. Avoid fertilizing right away to prevent salt stress.
6. Provide Aftercare
Once repotted, let seedlings recover in a sheltered spot out of direct sun for a few days. Then gradually transition them back to their full light conditions.
Avoid disturbing root balls again until it’s time to transplant into the garden. Stake tall, leggy plants for support as needed.
Tips for Up Potting Seedlings
Follow these tips for up potting success:
-
Work with an assembly line system – fill new pots, transplant seedlings, then water at the end.
-
On hot days, work in the early morning or evening to avoid heat stress. Or up pot indoors.
-
Handle seedlings gently by their leaves rather than thin stems, which bruise easily.
-
After repotting delicate seedlings like peppers, provide support with small bamboo stakes if needed.
-
When transplanting into larger containers, choose squat pots rather than tall narrow ones, as seedlings establish better this way.
-
Avoid fertilizing for 1-2 weeks after up potting to prevent salt stress on tender young roots.
-
If any roots were damaged during transplanting, prune them cleanly using sterilized scissors.
-
Group seedlings by size when up potting, so you can reuse emptied starter cells for smaller sprouts.
-
Water with a diluted seaweed fertilizer solution 1-2 weeks after repotting to provide nutrients and reduce transplant shock.
-
Keep an eye on watering after up potting. Larger pots dry out slower than starter cells but seedlings still need consistent moisture.
Common Up Potting Mistakes
Here are some errors to avoid when sizing up your seedlings:
-
Waiting too long until plants are severely root bound. This can stunt growth.
-
Going up more than 2-3 inches in container size. It’s too drastic a change for small plants.
-
Roughly handling stems and roots leading to bruising or accidental snippage.
-
Skipping drainage holes on indoor pots. Seedlings need these to avoid saturated soils.
-
Forgetting to water after repotting leading to dry, stressed out plants.
-
Fertilizing too soon before roots establish, causing fertilizer burn.
-
Transplanting on a hot sunny day, leaving tender plants exposed to harsh conditions.
-
Packing down the new potting mix, which suffocates delicate feeder roots.
-
Overcrowding freshly up potted seedlings, limiting air movement around plants.
Best Soil for Up Potting
The growing medium you use when sizing up containers makes a difference. Here are smart soil choices:
Indoors: Use a commercial seed starting mix or potting soil blended for container plants. Look for a lightweight, soilless blend.
Outdoors: Outdoor potting mixes work well. Multipurpose blends provide nutrition for the whole season.
Homemade: Combine peat moss or coconut coir, compost, perlite and vermiculite for aeration and water retention.
Extra Perlite: For species prone to overwatering like basil, add extra perlite to improve drainage.
Worm Castings: Mix in 10-20% castings for slow, steady nutrient release without burning tender roots.
No Nutrients Needed: Avoid heavy compost or fertilizers, as seedling roots are easily damaged.
pH 5.5 to 6.5: Target a slightly acidic pH ideal for nutrient availability. Test and amend mix as needed.
Troubleshooting Seedlings After Up Potting
Seedlings may show some transplant stress after repotting. Here’s how to get them back on track:
Wilting or drooping: Increase humidity and water gently. Don’t overdo it, as saturated soil causes more damage.
Leaf yellowing: Usually just adjustment to new soil. Fertilize lightly in another week or two once roots recover.
Leggy growth: Ensure adequate sunlight. Bury lanky stems deeper or support with stakes.
White crusty deposits: Salt buildup from excess fertilizer. Flush soil by watering thoroughly until it drains freely.
Mold or damping off: Probably overly damp conditions. Allow soil to dry out a bit between waterings. Increase airflow.
Root rots: Repot any plants showing dark roots into fresh sterile mix. Disinfect pots before reuse.
With attentive yet gentle handling, the right containers, and proper aftercare, your seedlings will quickly bounce back from repotting stress. Before you know it, they’ll be big and strong, ready for their final transplant home outside in the garden!
Best Soil for Potting Up
When potting up fairly large, established seedlings with a decent root ball (like the tomato in this example) we use a high-quality organic potting soil, straight from the bag. Potting soil is more dense and rich (and often contains mild fertilizer) than the seed starting mix it was previously growing in. At this stage in maturity, the seedlings will appreciate the additional nutrients!
However, if you’re repotting very small, less established seedlings (under 2 inches tall) that have thin fragile roots and no solid formed root ball, they will do best in lighter soil. In that case, mix 60% organic potting soil and 40% of your favorite seed starting mix. That way, the tender roots meet less resistance when they’re trying to grow.
The Importance of Potting Up
Potting up seedlings as they grow helps them grow faster, healthier, larger, prevents stress or stunting, and generally live their best life.
- Potting up seedlings into larger containers prevents root-binding. A plant is “root bound” when it’s roots run out of space to grow, so they begin to wind in a tangled circle around themselves. While you can sometimes very gently loosen the roots, severe root-binding can also cause permanent stunting and damage to a plant – even after it’s transplanted outdoors.
- Potting up promotes better (even) water retention and prevents seedlings from accidentally drying out. As seedlings grow larger, they drink more water and thus dry out more quickly. You’ll notice that a 6-pack of tiny seedlings needs water far less often than the same size 6-pack full of large, thirsty seedlings.
- Repotting also feeds the seedlings by offering new richer soil. Fluffy seed starting mix is ideal for germinating seeds, but is fairly devoid of nutrients. Within a few weeks of sprouting, your seedling’s growth may begin to stall out. The plants will appreciate a slightly richer soil now, and/or an occasional water with dilute seaweed extract for added nutrients.

Potting Up Seedlings 101: Easy Seed Starting Tip!
FAQ
When should I up pot my seedlings?
-
True leaves:Look for the development of at least two sets of true leaves (not the seed leaves or cotyledons).
-
Root-bound:Gently lift a seedling to check if its roots are tightly packed and circling the bottom of the container.
-
Stunted growth:If your seedlings are growing slower than expected or appear stunted despite proper care, it’s a sign they need more space.
-
Yellowing lower leaves:Yellowing of lower leaves can indicate that the plant isn’t getting enough nutrients and needs a larger container.
-
Roots coming out of the bottom:If you see roots emerging from the drainage holes, it’s a clear sign that the pot is too small.
-
Plant falling over:If the plant is so big that it’s falling over, it’s time for a new pot.
How do you pot leggy seedlings?
Leggy seedlings in case of insufficient light, the stem of your seedling will extend itself. to search for more light. So take a fork, gently put out your seedling, take a deeper container with drainage oils, add some fresh soil, rebuilt your seedling deeper, add some fresh soil up to the top, and voila!
How to transfer seedlings to bigger pots?
- Choose the right pots: Select pots that are large enough to accommodate the seedling’s growth, but not so large that the soil stays too wet.
- Prepare the potting mix: Use a good quality, well-draining potting mix.
- Fill the pots: Fill the new pots with the potting mix, leaving some space at the top.
How big should seedlings be before transplanting into pots?
Tips Before You Transplant
Make sure that your seedling is about 2-3 inches high before transplanting.
Should you pot up seedlings?
Another reason to pot up your seedlings is so the plant’s roots don’t get root-bound. As the roots of the plant continue to grow, they will take up the entire container if you do not continue to move them to a larger pot. The roots will continue to fill the pot so there is not enough room for soil, water, or nutrients.
How do you plant seedlings in a pot?
As you work to fill the pot, lightly pack the soil around the rootball with your fingers. Once it’s full, give it a little water so everything can settle, then fill in any holes that appear, if necessary. Step 5: Add a plant tag – Adding a plant tag to each pot will help you identify your seedlings later.
Should I move seedlings to a larger pot?
Moving seedlings up to a larger pot allows them to have the space needed for their roots to continue to grow and become a strong support system for your plants. If you have a short growing season and start your seeds indoors to get a head start on growing you will be potting up seedlings.
When to pot up seedlings?
When to pot up seedlings depends a lot on what type of plant is growing. If you are potting up after starting your seeds in seed trays or plugs the timing may depend on the plant. Typically you will wait until your plant has its first set of true leaves. The first leaves that develop from seed are called the cotyledon leaves.
How do you grow a seedling in a container?
Fill the bottom of the container with soil. Tip over the seedling and gently dump it into your hand. Hold the stem carefully between your fingers. A plant can grow new leaves or roots, but won’t recover from a damaged stem. Place the seedling on top of the layer of soil. Gently fill in and firm soil around the seedling.
How do you start seedlings?
I start my seedlings in a 1-inch by 1-inch soil block to start. When they have their first set of true leaves then they are potted up to a 3-inch pot. If it is still too cold for the plants to go outside in my zone I plant up to a 6-inch pot. Typically when you start seeds indoors you are using a seed-starting soil mix.