When I was new to gardening, I depended upon the kindness of friends and strangers to help fill my beds. Unfortunately, I was too green to realize what treasures I had in hand until I’d wasted them.
When an elderly friend gave me her heirloom, ruffled, pink, annual poppies (Papaver somniferum), I sowed them freely in a new bed of perennials. The first year they did fine, no doubt because I’d planted hundreds of seeds. By the second year, though, the perennials had filled in, leaving no bare space for poppies to sprout. I scavenged a few plants when I saw they were struggling and transplanted them to open areas of my garden, but in vain. Poppies need to be moved with their roots undisturbed, intact in a shovelful of soil. The bare-rooted seedlings I’d pulled up hung on for a few weeks, then declined and died. By that time, my friend had passed on to the great garden in the sky, and the new owner had turned her glorious gardens back to grass.
No problem, I thought—I’d just purchase seeds. Turns out that those pretty, frilly flowers were the result of decades of natural selection in her garden. After years of self-sowing and my friend pulling out the plants with single-petaled flowers or off colors, they’d settled into a variety that reliably reproduced itself year after year. I spent more money than I want to admit buying seeds from every available supplier before I realized the sad truth. Her variety of poppies wasn’t offered commercially. So I started from scratch, saving seed from the prettiest poppies until I had something close to my friend’s ruffled beauties. Now, I can smugly say I have my own strain of annual pink poppies from which I religiously gather seed year after year to perpetuate what I call the ‘Sally’ strain.
Collecting seeds is one of those activities that makes me feel like a wealthy woman. As the seed supply spills out of the first, small envelopes into manila 8210s and Mason jars, I take as much pleasure as Midas in counting my riches of coreopsis (Coreopsis lanceolata and other spp.), calliopsis (Coreopsis tinctoria), hollyhocks (Alcea rosea), and moonflowers (Ipomoea alba), among others. By the time I’m finished in fall, I will have shelves stuffed with the makings of next year’s garden.
Ambius plants bring natural beauty and clean air into homes offices hotels and other spaces. Starting these gorgeous plants from seeds can be rewarding, but also requires some knowledge. In this comprehensive guide, we’ll explore everything you need to know about Ambius plant seeds – from proper storage and germination to techniques for successful sowing.
Germinating Ambius Plant Seeds
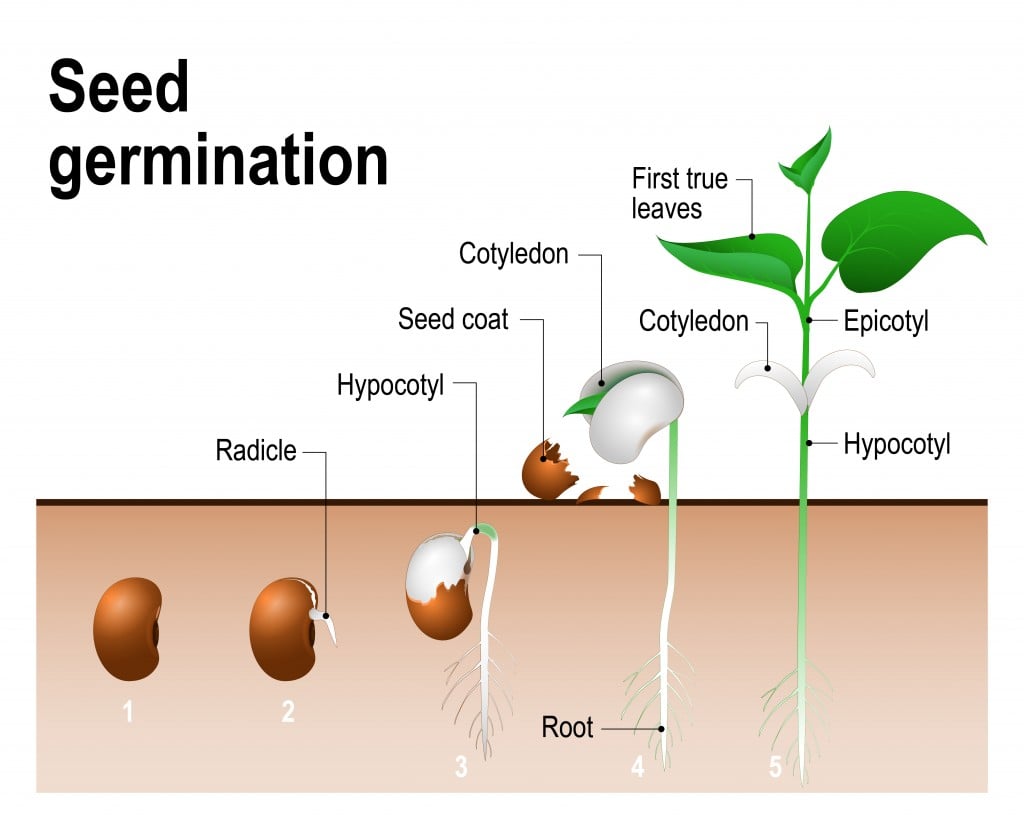
Germination is the first step to growing Ambius plants from seeds. This process happens when the seed begins to sprout and the plant embryo emerges.
Here are some key tips for successful germination of Ambius seeds
-
Moisture – Ambius seeds require moisture to germinate Use a spray bottle to mist the planting medium or soak the seeds overnight before planting Don’t oversaturate.
-
Warmth – Maintain a soil temperature of 70-75°F. Consider using a heat mat or grow lights to maintain warmth.
-
Light – Some Ambius seeds require light to germinate, while others prefer darkness. Check requirements for your specific variety.
-
Planting Medium – Use a sterile, soilless mix designed for starting seeds. This prevents damping off disease.
-
Proper Depth – Follow instructions on seed packet for planting depth. Small seeds are just lightly covered while larger seeds are buried deeper.
With the proper conditions, most Ambius seeds will sprout within 1-2 weeks. Mist to keep seeds moist and move sprouted seedlings to bright light.
Storing Ambius Seeds
To maintain viability and germination rates, proper storage of Ambius seeds is a must.
Follow these tips for success:
-
Place seeds in an airtight container like a plastic bag or glass jar. This prevents moisture loss.
-
Store containers in a cool, dark place like the refrigerator. Temperatures between 35-41°F are ideal.
-
Avoid humidity fluctuations – this can cause mold or mildew growth.
-
Label containers with the seed type and year harvested. This lets you know when seeds expire.
-
Inspect seeds periodically and discard any that are moldy or insect-infested to prevent spreading.
With proper storage conditions, most Ambius seeds remain viable for 1-3 years before germination rates begin to decline.
Sowing Ambius Seeds
Once your Ambius seeds have germinated, it’s time to transplant the seedlings into their permanent pots or garden spaces.
Follow these tips for successful sowing:
-
Choose containers with adequate drainage holes to prevent root rot.
-
Use a sterile, soilless potting mix specifically for indoor plants. This prevents diseases.
-
Bury root ball slightly deeper than it was previously planted to encourage stability.
-
Water thoroughly after sowing and mist leaves to reduce transplant shock.
-
Place in bright, indirect light. Acclimate to direct sunlight to avoid leaf scorch.
-
Consider using row covers or cloches to boost warmth and humidity levels.
With attentive care while sowing, your Ambius seedlings will flourish in their new container or garden home. Be sure to continue meeting their light, water and fertilization needs.
Frequently Asked Questions
Still have questions about growing Ambius plants from seeds? Here are some commonly asked questions:
How long do Ambius seeds stay viable?
Most Ambius seeds remain viable for 1-3 years when stored properly in cool, dry conditions. Viability declines over time.
What type of soil should I use?
Use a sterile, soilless potting mix made for indoor plants. This prevents issues with pests, diseases and improper pH.
Do Ambius plants need special lighting?
Ambius plants need bright, indirect light. Supplement with grow lights or gradually introduce to direct sunlight if needed.
What temperatures should I maintain?
Daytime temperatures of 60-75°F and nights around 55-65°F work well for Ambius plants. Avoid extremes in hot or cold.
How often should I fertilize Ambius plants?
Fertilize Ambius plants every 2-3 weeks during the growing season using a balanced houseplant fertilizer diluted to half strength.
Growing beautiful Ambius plants from seeds starts with proper planting techniques, storage, germination and sowing. Follow these best practices and you’ll have thriving plants that enhance your indoor spaces.
Gather seeds as they ripen

When I see flowers fading, I keep an eye on the forming seeds. As the seed heads turn brown with ripeness, I snip them off. Usually, I cut carefully, one seed head at a time. But when seeds are ripening fast, as when my bank of Klondike cosmos (Cosmos sulphureus) goes to seed, I clip seed heads wholesale, gathering them in a brown paper bag or any plastic container. If this sounds like a lot of work, it isn’t. I carry a supply of zip-top baggies in my pocket as I stroll the garden, which I do at least once a day. Nipping off seed heads or shaking out seeds takes just minutes.
I collect seed as it ripens through the season—that means starting in March, when small bulbs are already ripening their plump pods, and continuing until frost blackens the garden and knocks down the morning glories (Ipomoea tricolor and I. nil) so that I can reach the fat clusters of pods. Peak season is late summer, when perennials and annuals are blooming fast and furious. Another big push comes in fall, when I outrace the birds to collect berries from shrubs and trees.
Learning when seeds are ripe enough to collect is like picking tomatoes: experience teaches you when they’re at their peak. Actually, it’s more like picking green tomatoes, though, because the seeds will continue to ripen off the plant—just as a tomato does—once they’ve reached a certain point of development.

I’ve learned that I can collect seeds when they’re still green, as long as I let them continue ripening in the pod or seed head, which most of them will do even if they’re removed from the plant. The seed heads of dill (Anethum graveolens) shatter quickly as they ripen, and sometimes I miss my chance. So I clip the flat heads as soon as the green seeds have reached a good size and set them on sheets of newspaper in the garage to finish maturing. I do the same thing with columbines, too, clipping the erect chambered seedpods when they’re green, and with annual poppies and spider flowers, which self-sow too quickly.
Don’t pick seed heads immediately after the petals fade, though. Wait until the seeds themselves, if they’re visible, have reached mature size if not ripeness. I think of this as the sunflower rule: I hold off picking the heads of these cheerful flowers until I can see that the seeds have plumped up. If I pick them while they’re still shrunken and flat, they never fill out. Same thing with seeds in pods, like scarlet runner beans (Phaseolus coccineus) and lupines (Lupinus spp.): Hold off harvesting until the pods fatten from the seeds within. Seeds need the living plant to give them nourishment while they swell into full size in the seed coat.
Start simply, with flowers

Packet prices can add up in a hurry, even if you have only a small bed to fill. A few minutes of shaking ripe seed into an envelope in the early fall can produce a summer garden next year that is filled with mallows, petunias, marigolds, and other favorites—all grown for free. Saving your own seeds enables you to use your garden budget for major nonplant investments, like that teakwood table and chairs you’ve been lusting after.
You can save seeds from all kinds of plants. Annuals are the easiest because they’re the most prolific at producing seeds, but perennials and biennials are entirely possible. However, some plants aren’t worth gathering seed from because they reproduce much faster by division. I don’t fool with bee balm (Monarda didyma), daylilies (Hemerocallis cvs.), irises (Iris spp.), or showy evening primrose (Oenothera speciosa), for example. Although I could grow them from seed, why bother? A quick thrust with a trowel and I have a good start ready to plant.
It never occurred to me to save seed from bulbs until a few years ago, but now I do it all the time. Small, early spring bulbs like scillas (Scilla siberica) and snowdrops (Galanthus nivalis) are particularly rewarding. Instead of waiting half a lifetime to have an ocean of blue scillas under my trees, I accomplished it in five years by collecting seed and nurturing the tiny plants that sprouted, planting them one by one in a gradually outward-spreading area.
Birds gave me the idea of growing vines, shrubs, and trees from seed. They “deposited” the start of many of the plants in my woodsy front yard, from virgin’s bower (Clematis virginiana) to American holly (Ilex opaca) and hawthorn (Crataegus spp.). I appreciate the birds’ efforts, but I like my plantings a little less willy-nilly, so now I do my own collecting of berries and seeds for woody plants.
Flowers are best for beginners, because most of them need no special treatment to encourage seeds to sprout. Self-sowing plants, like California poppies (Eschscholzia californica), spider flowers (Cleome hasslerana), and cottage garden columbines (Aquilegia vulgaris), are perfect to practice on.
Not all plants grown from seed look like their parents. Those that do are called “heritage seeds.” They’re a specialty of some catalogs and, more informally, among backyard gardeners. Like my friend’s pink poppies, or the wonderful ivory-seeded sunflowers (Helianthus annuus ‘Tarahumara White’) developed by Tarahumara Indians of the Southwest, these plants always “come true” from seed.
By collecting seed from many plants in your garden, you’re bound to be rewarded with surprises. One of my favorite garden flowers is an oddball-striped, russet marigold that brightens my summer garden. It cropped up from a batch of seed I saved from an expensive named variety, and I gradually weeded out the strays until it bred nearly true. Now I hand out envelopes of the seeds, confident that most of the young’uns will look a lot like Mom Marigold, but knowing that friends may get their own just-as-welcome surprises in the batch.