If you’re looking for something to brighten up your home during the dark winter days, an amaryllis (genus Hippeastrum) might be a good choice. These unassuming bulbs produce amazing flowers in a wide range of colors, the result of a long history of selective breeding.
Keep reading for everything you need to know about growing an amaryllis indoors and how to make sure yours blooms beautifully year after year.
Disclosure: If you shop from my article or make a purchase through one of my links, I may receive commissions on some of the products I recommend.
Before we discuss amaryllis care, a quick word on taxonomy so we’re all on the same page about which plant we’re talking about.
Like many other plants, amaryllis have been the subject of much taxonomical debate. They were at first placed in the African genus Amaryllis, but this was later changed to Hippeastrum when it became clear this is a different species from South America.
Sounds simple, but it involved over 50 years of debate, not to mention that until 1970 the name Leopoldia was also accepted.
Despite the move from the genus Amaryllis (African spring bloomer) to the genus Hippeastrum (South American winter bloomer), the name stuck. We still refer to the winter bloomer as amaryllis, though without the capitalization that we’d use for a genus name.
Did you know? Although some of its common names refer to amaryllis as a lily, they’re not actually related to true lilies. Their flowers just look alike!
Unlike the “true” Amaryllis, Hippeastrum is naturally found in South America. There are actually more than 90 different species out there with a very wide range (and new ones are described on the regular!), although the largest concentration is found in Brazil.
Due to this wide spread, it isn’t possible to pinpoint a single habitat: some amaryllis species grow in the tropics, while others are found in temperate climates. Some like the scorching sun, others prefer more shaded spots. Water and soil needs vary as well.
Despite there being so many different types of amaryllis, one thing they have in common is their looks. These plants grow from bulbs with a papery exterior and smooth interior.
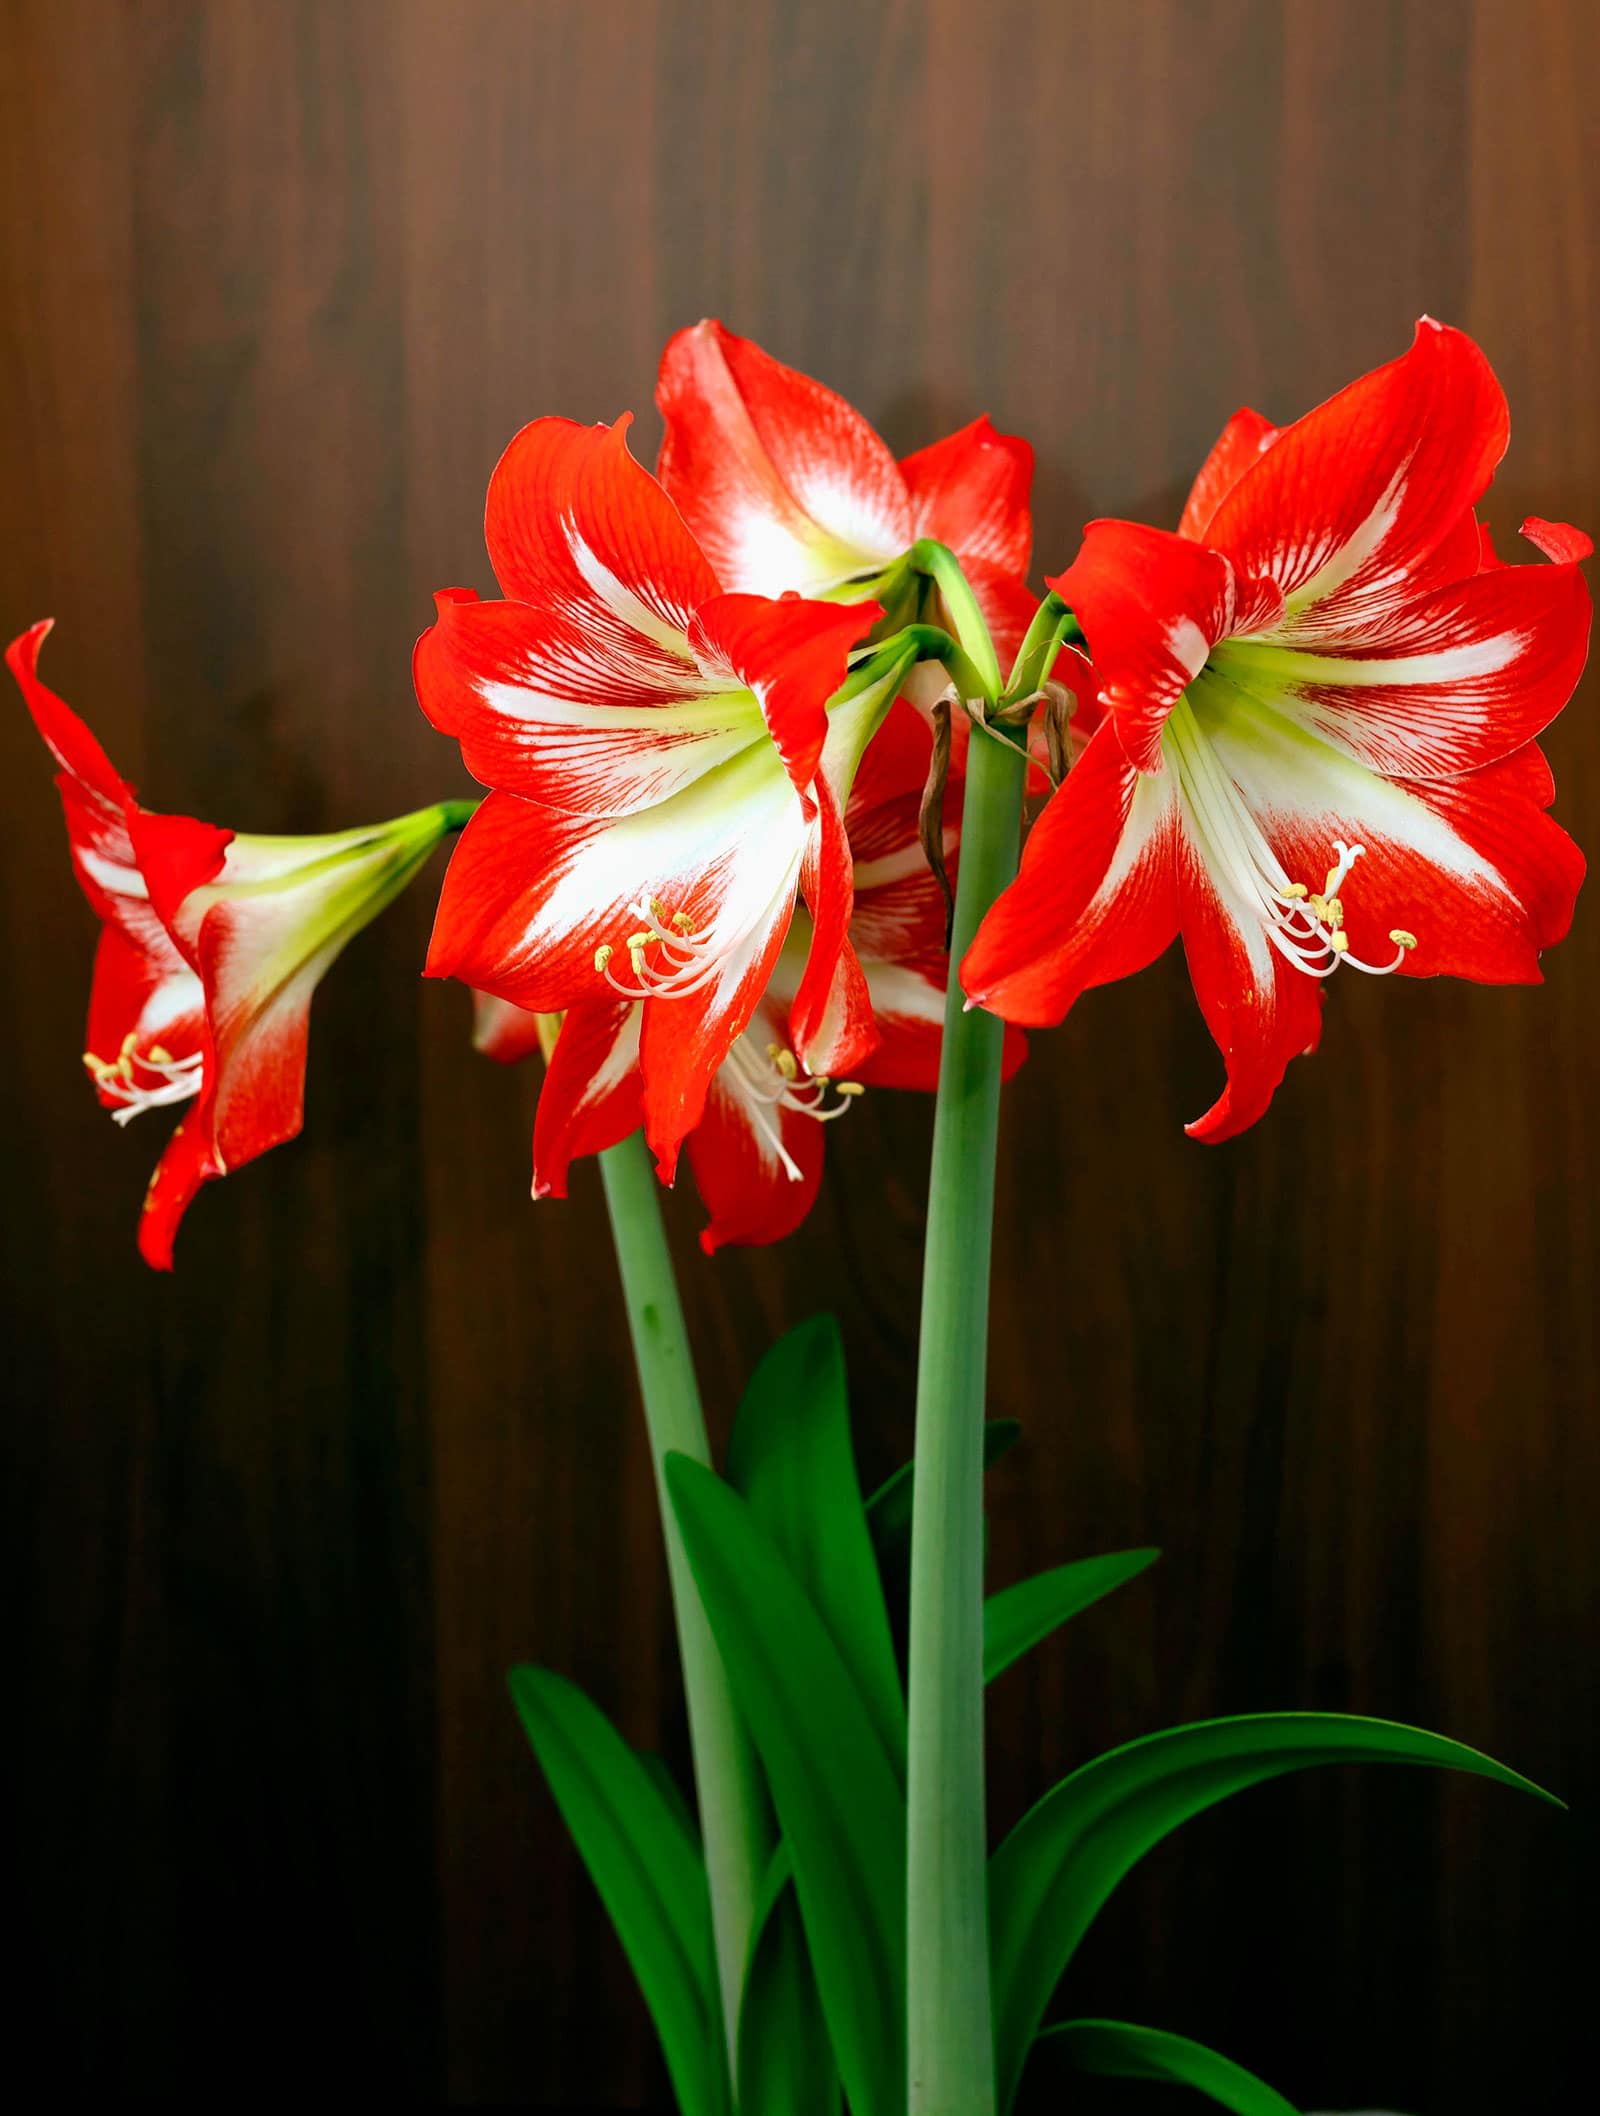
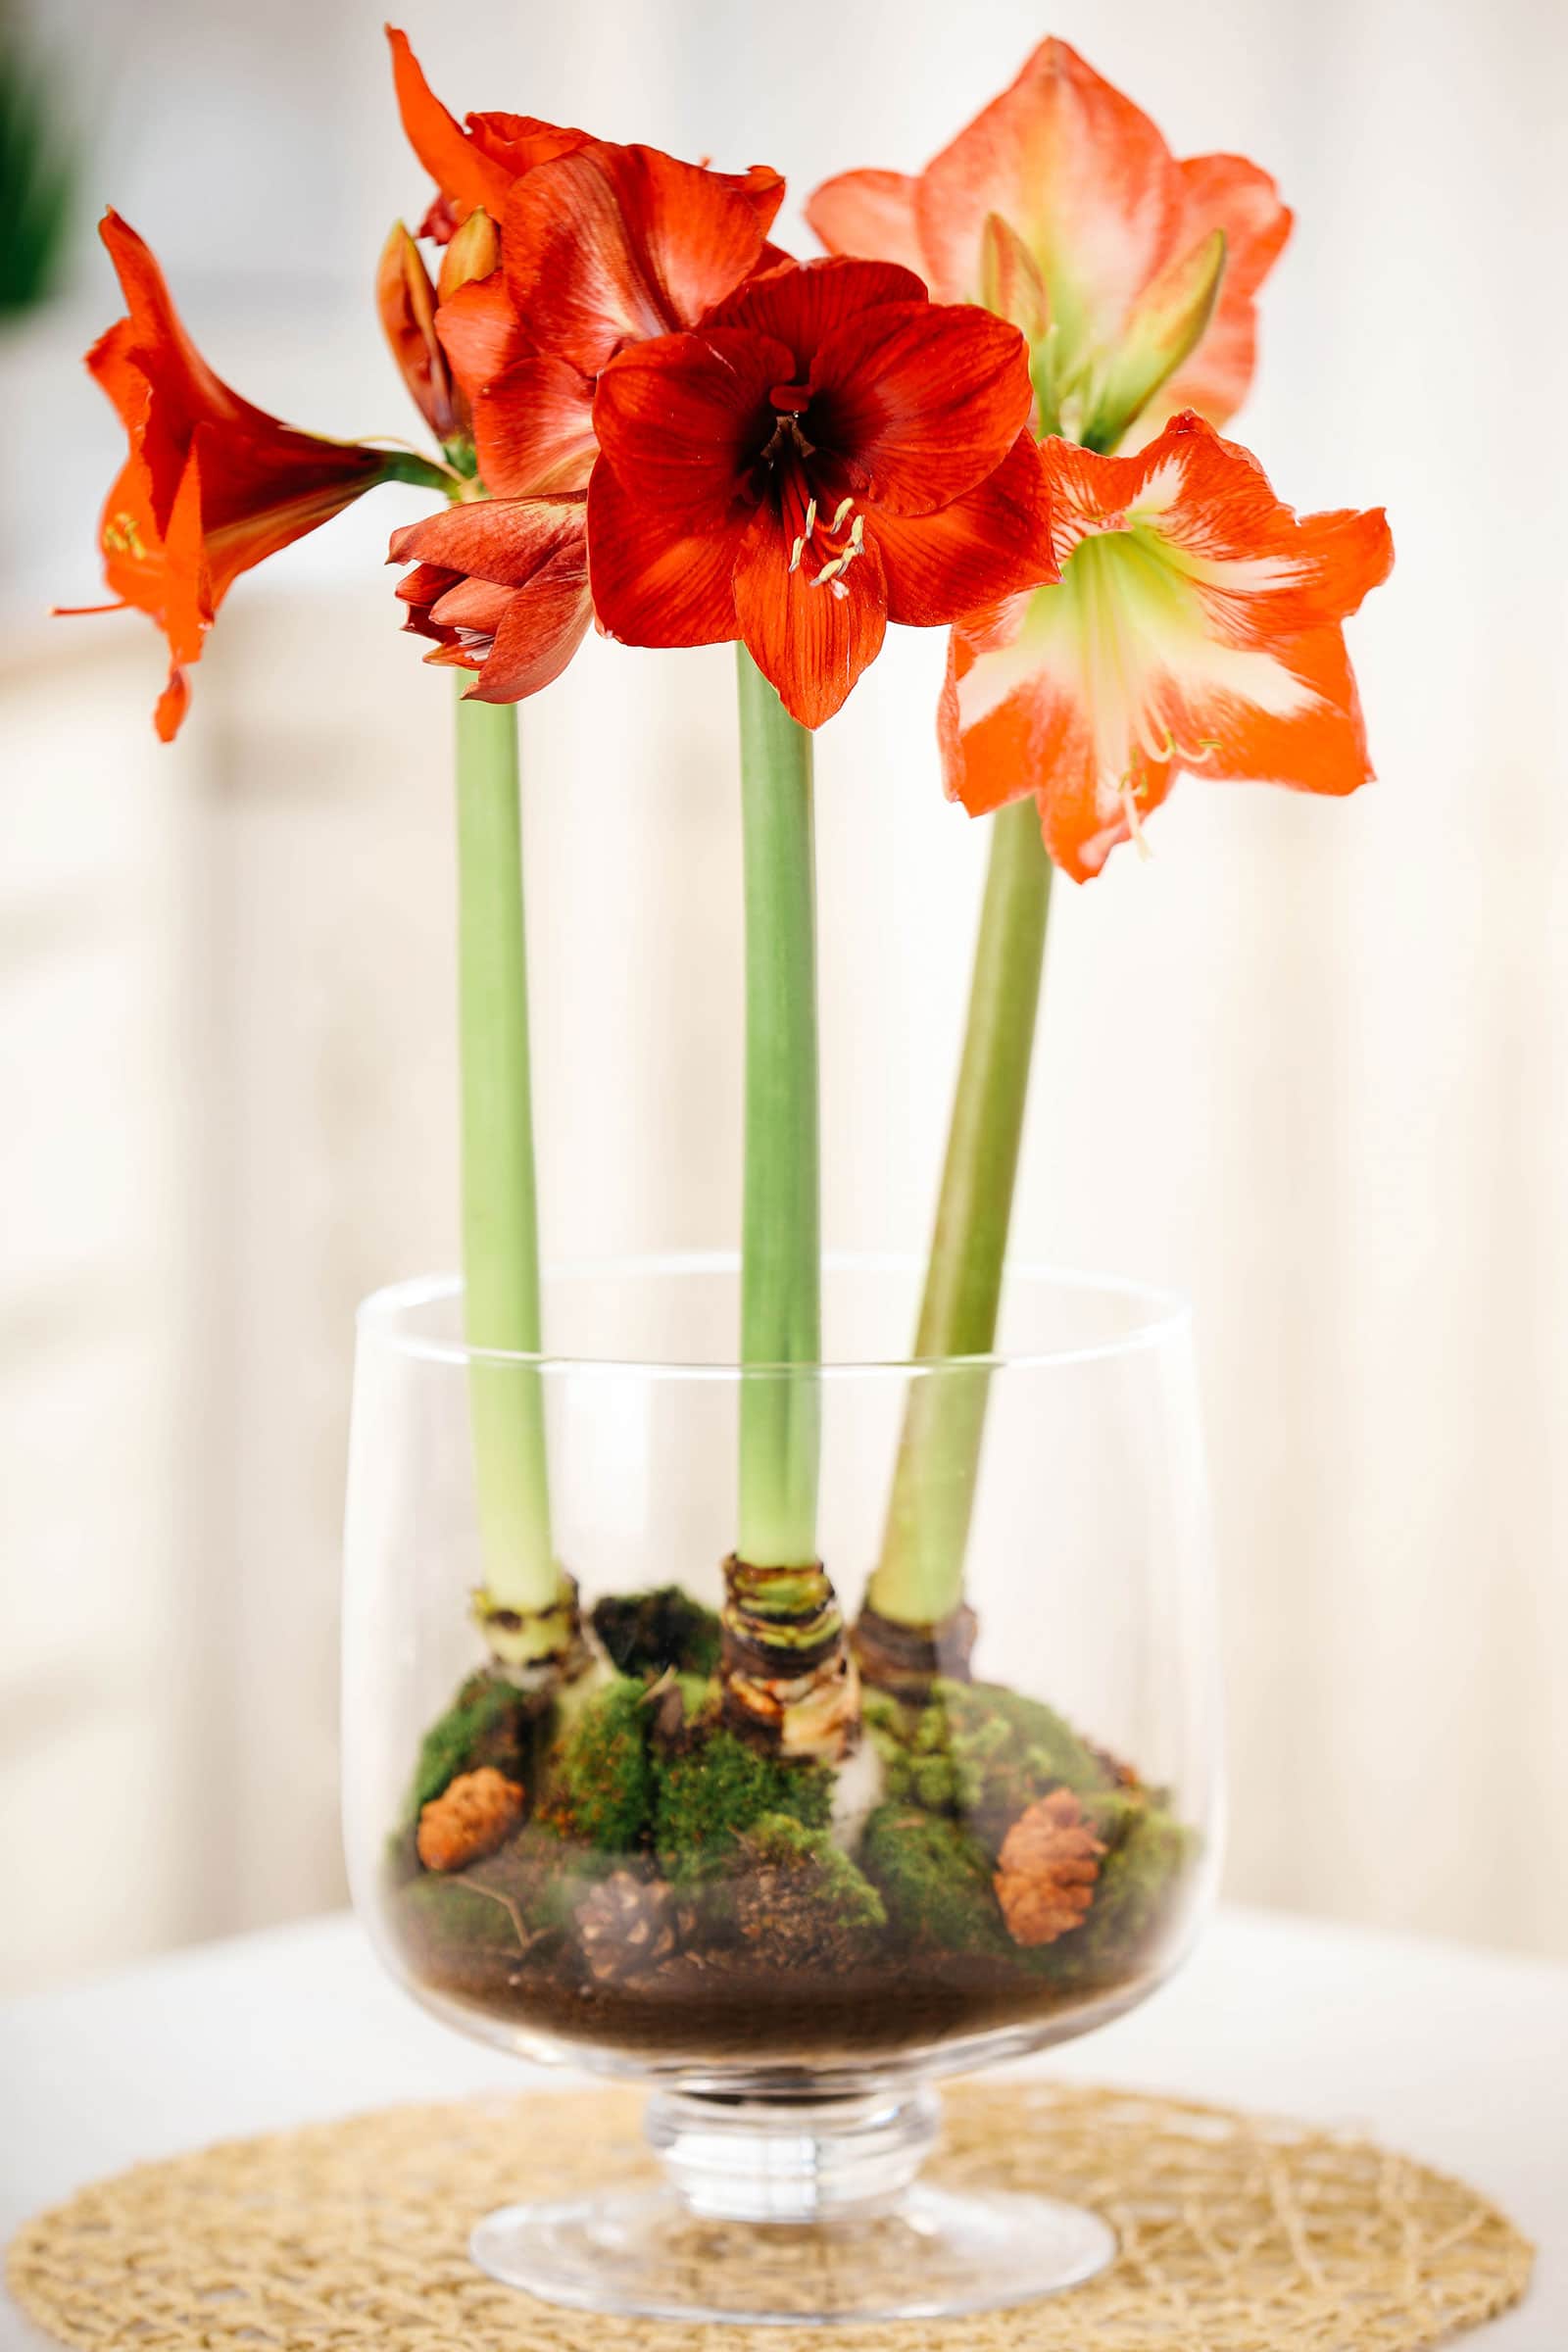
During the summer months, when it’s not blooming, an amaryllis will usually sport long green leaves. Once winter rolls around and the blooms appear, these leaves tend to die off. This leaves only one or multiple thick, straight green stems, with any number of large flowers in shades of white, orange, pink, and red.
Although it’s not uncommon for an amaryllis to be reduced to just its bulb for some of the year, this is really a very spectacular plant when it blooms. It’s not difficult to imagine why it became so popular!
Amaryllis has an almost 200-year history, starting from when it was likely first described in the mid-18th century.
The first cross had been produced in England by the early 19th century and the hybridization and selective cultivation of the different species hasn’t stopped since. Nowadays, there are amaryllis in many colors, with different flower shapes, sizes, and numbers.
The commercial interest in these plants probably has something to do with their blooming time, right in the middle of winter in the Northern Hemisphere. What could be more attractive than a few huge flowers to brighten your home during these gloomy months?
Like other winter bloomers such as Christmas cacti and Cyclamen, amaryllis is now a classic Christmas flower. The bulbs are widely sold as gifts or decorations in ornamental pots and vases.
Amaryllis have become synonymous with the holiday season because when they’re grown as houseplants, they usually bloom in December. (This is in stark contrast to their natural blooming period in summer when they’re grown outdoors in the ground.)
The showy trumpet flowers come in a range of colors (including bicolor and picotee varieties), but red amaryllis tends to be a Christmas favorite.
Due to the extensive hybridization and selective breeding of Hippeastrum, there are literally hundreds of different cultivars out there, not to mention hybrids between different species. More than I could ever describe here!
If you’d like to explore some of the endless amaryllis varieties, the Pacific Bulb Society has a Hippeastrum hybrid page.
When purchasing amaryllis bulbs for yourself or as gifts, you can go with either an early-blooming South African amaryllis to deliver gorgeous color during the holidays, or a later-blooming Dutch amaryllis to brighten up the dark days of January once all the lights and decorations are put away.
Amaryllis bulbs are typically sold as dormant bareroot bulbs, or pre-potted in soil and ready for display. You might even come across waxed bulbs, which are extremely popular as Christmas gifts in the US and Europe.
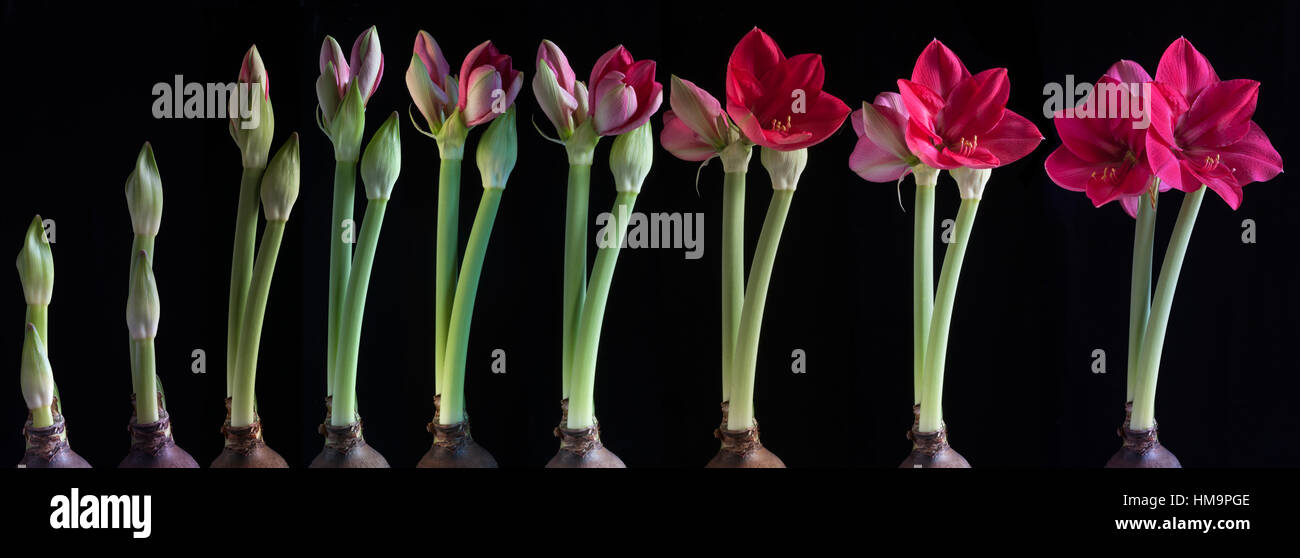
Amaryllis plants are popular indoor flowering bulbs that can brighten up any living space with their large showy blooms. But getting them to bloom at just the right time requires an understanding of their growth cycle. In this article we’ll explore the different stages of amaryllis plant growth so you can successfully cultivate these beauties in your own home.
Overview of Amaryllis Growth Stages
The amaryllis bulb goes through five main growth stages
- Bulb planting
- Root development
- Leaf growth
- Flower stalk emergence
- Blooming
The duration of the growth cycle can vary quite a bit, but generally takes 6-12 weeks from bulb planting to bloom. The timing depends largely on when the flower stalks emerge.
Let’s take a closer look at each stage
Stage 1: Bulb Planting
Amaryllis bulbs can be planted anytime from September through December. Choose a pot that’s just a bit larger than the bulb itself, with drainage holes at the bottom.
Fill the pot most of the way with a well-draining potting mix. Place the bulb in the center with its pointed end facing up, leaving about 1/3 of the bulb exposed above the soil line. Water well after planting.
Stage 2: Root Development
This crucial stage lasts 2-4 weeks. During this time, the bulb is busy growing roots down into the potting mix to anchor itself and take up water and nutrients.
Keep the soil evenly moist, but not soggy. Too much water can lead to rotting. Root development is complete when you see the first green shoots emerging from the top of the bulb.
Stage 3: Leaf Growth
Over the next 4-8 weeks, leaves will rapidly unfurl and lengthen. More leaves will continue to emerge from the bulb while existing leaves elongate.
The foliage may start to droop or curve downward under its own weight as it matures. This is normal. Just rotate the pot regularly to encourage upright growth.
Provide bright, indirect light during this stage to fuel leaf development. Water when the top inch of soil dries out.
Stage 4: Flower Stalk Emergence
At some point during leaf growth, you’ll notice a tall, slender flower stalk begin to rise up from the center of the bulb. This typically occurs around 3 weeks after the first leaves appear.
As the stalk elongates, you’ll be able to see the flower buds developing at the top. Support the stalk with a stake if needed to prevent toppling. Keep soil moist and provide ample light.
Stage 5: Blooming
Just 1-2 weeks after the flower stalk emerges, the buds will begin opening into gorgeous blooms. The flowers last up to 2 weeks in peak condition.
Remove spent blooms promptly and keep watering during this stage to prolong flowering. Cool temperatures and direct sunlight can shorten bloom time.
Factors that Influence Growth Rate
The total time from planting to blooming can range from 6-12 weeks. Here are some factors that affect amaryllis growth rate:
-
Bulb size – Larger bulbs tend to grow and bloom faster than smaller bulbs.
-
Time of year – Bulbs planted in early fall may develop a bit slower than those planted in late fall/early winter.
-
Temperature – Warmer temperatures (70-85°F) accelerate growth; cooler temps delay it.
-
Light exposure – Insufficient light slows growth and causes lanky, weak foliage.
-
Watering – Too much or too little water stresses the plant and inhibits growth.
-
Fertilizer – Applying fertilizer every 2-4 weeks fosters vigorous growth.
Controlling Flowering Time
With proper care, you can manipulate amaryllis growth stages to bloom at specific times, like the holidays. Here are some tips:
-
To bloom for Christmas, plant bulbs in September/October so flowers appear in late December.
-
After flowering, cut off the flower stalk and allow the foliage to die back naturally over 2-3 months.
-
Place the dormant bulb in a cool, dark place for 6-8 weeks to break dormancy.
-
Replant the bulb 8-10 weeks before desired bloom time.
Staggering bulb planting dates allows you to have amaryllis blooms all season long!
Understanding the progression of amaryllis growth stages enables you to successfully cultivate these spectacular blooms. With a little patience and proper care, you can have amaryllis flowers gracing your home throughout the winter months.
Common questions about amaryllis
Once planted, an amaryllis bulb takes six to eight weeks to begin blooming. That means if you want a lovely, fully-bloomed amaryllis for Christmas, you should plant and water it in early November, to be on the safe side. (Keep in mind this timeline applies to dormant bulbs without stems.)
Caring for amaryllis indoors
The most important thing to keep in mind if you want your amaryllis to thrive long-term is that their needs vary according to the season.
Your amaryllis will appreciate bright light throughout the year except if you’re forcing blooming (which I’ll talk more about later). They can handle a bit of direct sun, although light shade isn’t a problem either, especially outdoors where the light is stronger.
If your amaryllis is flowering, it can be helpful to protect it from the strongest rays to avoid damaging the blooms.
The ideal temperature for an amaryllis varies with the seasons as well, though it’s important to remember that these plants aren’t frost-hardy. They like to be outside for part of the year, but should be brought back in for blooming once outdoor temperatures drop into the 50s (Fahrenheit).
For most of the year, your amaryllis will appreciate regular waterings. Let the top few inches of the soil dry out before watering again to prevent it from staying too soggy, but don’t wait until the soil is bone dry. Let excess water drain from the pot; bulbs are very sensitive to rot!
When it comes to humidity, amaryllis aren’t very demanding. Although they won’t appreciate very low humidity, the normal air moisture levels in a home should be fine for them.
Amaryllis bulbs aren’t difficult when it comes to containers and soil either. Select a planter that’s only a bit larger than the bulb and has a drainage hole in the bottom. Wet feet can cause bulb rot!
The soil mixture should be well-draining too, but also contain plenty of rich, organic material. A peat-based potting soil works well, especially with a handful of perlite to make it less compact. If you’ve got something like compost or worm castings on hand, your amaryllis will definitely appreciate some of that.
When potting your bulb, don’t bury it. Up to half can remain exposed; just make sure the roots are covered.
As you’ve probably gathered from the previous section, amaryllis loves a bit of fertilizer. You can include some manure, worm castings, or compost in your potting mix, but the use of a diluted liquid houseplant fertilizer will also be appreciated. As long as you see growth on your amaryllis bulb (leaves or stems), include some plant food with every other watering.
Stop fertilizing when the bulb isn’t producing any leaves or other growth. It doesn’t need any additional nutrients during these periods.
Recommended fertilizers for amaryllis:
Most sources recommend removing the flower stalk after an amaryllis has finished flowering, but I don’t really see why this would be necessary. As long as it’s green, it photosynthesizes, providing energy for the bulb. Once it does go yellow, you can remove the stem with a sharp knife.
Do make sure to remove the flowers themselves after they’re spent. Unless you want to grow amaryllis from seed, the development of the pods only drains energy.
You want the bulb to be able to photosynthesize as much as possible after the blooming period to make sure it has the strength to rebloom next year! (Or even bloom twice in the same year.) This is also why you should leave any foliage your amaryllis produces alone to let it work its magic.
Amaryllis bulbs are not very quick growers, though they can eventually outgrow their containers. You can repot the plant following the steps in the section above (on soil and planting), preferably right after a dormancy period when new growth is just starting to pop up.
You can also divide your amaryllis using the instructions on propagation below. This works well if you feel the bulbs are really starting to look a bit crowded, or if you’d like to have a few extra bulbs to give away.
The easiest way to propagate amaryllis is through bulb division. The plant does most of the work for you; mature and healthy amaryllis bulbs produce offsets in the form of new, smaller bulbs. You can leave these if you like the look of a big cluster of flowers, but you can also separate them.
Like repotting, propagating amaryllis is best done right after a dormancy period, when the plant is just starting to push out new growth. The easiest way to go about it is to take the whole thing out of its planter, allowing you to see all the offsets and selecting the best ones to separate.
Don’t remove bulblets that are still very small! They should be at least around one-third to half of the size of the original “mother” bulb.
The actual process of dividing the bulbs is easy as pie. A good tug or careful twist should usually be enough to loosen the bulblet, although you can also use a tool to pry it off the mother bulb if it’s firmly attached.
Just be careful with the roots. Pot up your brand new amaryllis bulb like you would normally.
If your amaryllis bulb doesn’t have any offsets but appears healthy, you can still propagate it using a method called bulb sectioning.
Bulb sectioning involves digging up the bulb, cleaning it, and cutting it straight from the top to the bottom into multiple sections. (According to research, you can divide it into up to 96 sections, but let’s start with 2 or 4!)
Apply some fungicide and plant each section. New bulbs should start growing, although it can be a few seasons before you spot the first flowers.
Lastly, you can also grow amaryllis plants from seed. This is mainly done by horticulture enthusiasts who enjoy crossing different hybrids and cultivars to create new ones, because the process is a bit too slow for the average hobbyist.
Amaryllis Growing and Blooming Time Lapse
FAQ
What is the growth pattern of an amaryllis?
What is the life cycle of an amaryllis?
What is the timeline for amaryllis?
Can you leave amaryllis bulbs in the ground all year?