“Elephant ears” is the common name for a group of tropical perennial plants grown for their large, heart-shaped leaves. Most of these herbaceous species in the arum or aroid family (Araceae) that are offered as ornamentals belong to the genera Colocasia, Alocasia, and Xanthosoma, although there are others that have similar appearance and growth habits.
The first two genera are native to tropical southern Asia, Indonesia, Malaysia, New Guinea, parts of Australia, or the Pacific Islands, while Xanthosoma is native to tropical America. Many of the species have long been grown for the edible starchy corms or tubers as an important staple food in tropical regions.
The leaves are edible, but they (and all parts of the plant) contain needle-like crystals of calcium oxalate which are a skin irritant, so they must be cooked first.
One of the most widely grown species is C.esculenta, called taro and many other common names. It has been cultivated in Asia and Polynesia for thousands of years, with over 200 cultivars selected for culinary or ornamental characteristics. This species naturalizes readily in wetlands in mild climates and is considered an invasive species along the Gulf Coast.
In the Midwestern garden these plants are grown for their flat sagittate (arrow- or heart-shaped) leaves that often have prominent veins. In their native habitat the smooth, waxy leaves will grow 3 feet long and 2 feet wide or more (depending on the species) but they tend to be much smaller when grown as a seasonal plant.
The leaves are held on the end of long, thick, succulent petioles coming directly from the underground corm. The petiole attaches near the center of the lower surface of the leaf (peltate) and the leaves are held perpendicular to the upright petiole with the leaves facing upward or outward.
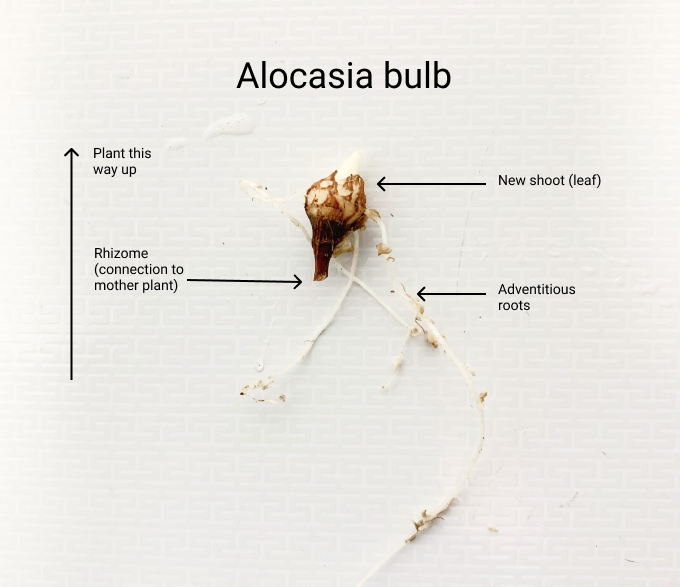
The leaves of Alocasia and Xanthosoma are usually not peltate and are held more upright. These plants generally grow from corms (commonly called bulbs, although they are not true bulbs),
but some types also produce long, slender stolons (above ground runners), and others do not form corms. The lumpy corms with rough ridges have a brown skin and a white or pink interior. Some types of elephant ears also produce smaller tubers or “cormels” (also called “eddos”) which grow off the sides of the main corm. Although elephant ears are grown primarily as foliage plants, they can bloom – but flowers are not common in the Midwest. The inflorescences are the typical aroid type with a white to yellow or light green spathe surrounding the spadix. They can be large, fragrant and attractive, but are normally hidden underneath the foliage. Fruits are globular green or yellow berries containing several seeds.
The standard emerald green C. esculenta, with a matte finish, used to be about the only type of elephant ear available to Midwestern gardeners, but over the past couple of decades breeding programs have produced a lot of new ornamental varieties. They vary in size from 8 inches to over 9 feet, but most are in the 3 to 5 foot range. Some of the many interesting cultivars available include (C. esculenta unless otherwise noted):
‘Coffee Cups’ (sometimes incorrectly called ‘Tea Cups’) – is a vigorous hybrid with smaller leaves on very tall dark petioles with the blades folded upward to form a cup-shape.
‘Hilo Beauty’ – is a small variety (about a foot tall) of Alocasia with irregular yellow or cream flecks on the dark green leaves.
‘Illustris’ (imperial taro, var. antiquorum) – has dark green matte leaves with a purple to black luster and bright green veins and petioles. The plants spread by underground runners. Color is more intense in bright light, but the leaves are never as dark as ‘Black Magic’ or many other black varieties.
Use elephant ears to add a bold, tropical look to the landscape in borders, mass plantings or in containers. These fabulous foliage plants add dramatic contrast with both the size and color of the leaves and their form. They combine well with other tropical plants such as bananas, castor bean, colorful caladiums,
Chinese hibiscus and mandevillea, but they also provide wonderful textural contrast with more typical temperate bedding plants, ferns, or ornamental grasses. Pair dark-leaved varieties with any white, yellow, or orange-flowering plant for vivid contrast. The clumping varieties have an attractive vase shape so a single plant can provide an interesting focal point in the garden when planted in the midst of low-growing annuals such as petunias or begonias. Add them to large aquatic containers in combination with papyrus and water lilies or keep them in individual containers to mix and match with other plants on a deck or patio.
Many types of elephant ears can be grown in partial shade, but the darker colored varieties are best grown in full sun. All need rich, moist soil and nearly all are perfect at the edge of a pond. Most can be grown in a few inches of standing water, and can be added to water gardens as emergent plants (the roots in water and with the soil just covered with water, but the plants not submerged).
These tropical plants grow best in warm temperatures and high humidity. They may languish in Midwestern gardens until warm summer conditions begin, and they will also falter when temperatures drop below 50F for prolonged periods of time.
The plants continually produce new leaves throughout the growing season. The older leaves that gradually die off can be removed to keep the plants looking tidy. Be sure to consider the potential for the elephant ear to shade out smaller plants as they grow when you choose a planting location in the spring.
Although they can be grown from seed, to grow large elephant ears, start with a large bulb or rooted plant (many of the newer cultivars are only offered as tissue cultured plants that have not formed bulbs yet). It will take a few weeks for the first leaves to appear from the bulb. These frost-tender perennial plants are best started indoors, potting up the bulb in March, placing the top of the bulb close to the soil surface, and keeping it in a warm location until it is planted outside when the weather warms up, usually in late May or early June.
Provide copious water and fertilizer as the plants grow, especially for those in containers, as they are heavy feeders. For plain green-leaved elephant ears, you can purchase taro (also called coco yam) root in Asian grocery stores and grow it instead of eating it (if the corms haven’t been treated with something to prevent growth).
Elephant ears can be grown as annuals, starting with new plants each year, or may be kept over the winter (most are hardy only to zone 8). Plants that have formed bulbs can be dug, dried and stored like cannas or dahlias after frost has killed the foliage. Illustris with other tender annuals. Alocasia x amazonica ‘Poly’
Those without bulbs are harder to keep indoors, although it may be possible to keep them going as houseplants if kept in a warm, bright location. It is best to bring plants to be kept as houseplants indoors before temperatures get into the 30’s. Cut back all but the top two leaves and keep at room temperature in bright light. Keep plants on the drier side when they are semi-dormant and resume regular watering and fertilizing when growth resumes in the spring. – Susan Mahr, University of Wisconsin – Madison
Alocasias are tropical beauties admired by plant lovers for their stunning arrowhead-shaped leaves. But what’s going on below the soil surface? Understanding the anatomy and function of alocasia roots and stems provides valuable insights into caring for these showstoppers.
In this article, we’ll explore the intricate root and stem systems that allow alocasias to thrive Read on to learn about
- The anatomy of alocasia roots and stems
- The key functions of these plant parts
- Tips for optimal care based on this knowledge
Let’s dig in!
Anatomy of Alocasia Roots
Alocasias have fibrous root structures that spread out horizontally from the base of the plant. These roots are made up of different layers, each with specialized functions:
-
Epidermis – This thin outer layer absorbs water and nutrients from the soil. Root hairs on the epidermis increase the surface area for absorption.
-
Cortex – Underneath the epidermis is the cortex, which stores carbohydrates and water.
-
Endodermis – This layer controls the flow of water and minerals to the inner parts of the root.
-
Pericycle – The pericycle strengthens the root and enables lateral root growth.
-
Vascular tissue – Xylem and phloem tissues run through the center of the root, transporting water, minerals, and nutrients.
The fibrous spread of alocasia roots maximizes their capacity to take up moisture and nutrients. Their wide horizontal reach also helps anchor the plant in place.
Anatomy of Alocasia Stems
Thick, upright stems support the large leaves and inflorescences of alocasias. These succulent stems have distinct layers:
-
Epidermis – The outer layer protects the stem from damage and disease. Stomata on the epidermis allow gas exchange.
-
Cortex – Made up of parenchyma cells, the cortex stores water, nutrients, and carbohydrates.
-
Vascular bundles – Also known as vascular tissue, these channels transport water, minerals, sugars, and nutrients up and down the stem.
-
Ground tissue – This pith-like tissue fills the interior of the stem, providing support.
Alocasia stems don’t contain true woody tissue like trees. But their succulent, water-filled stems readily supply moisture and nutrients to the lush foliage.
Key Functions of Alocasia Roots and Stems
Now that we’ve explored the anatomy, let’s look at what these intricate plant parts actually do:
Roots
-
Anchor the plant – The wide-reaching root system stabilizes the plant in the pot or ground.
-
Absorb water and nutrients – Root hairs take up moisture and minerals from the soil.
-
Transport nutrients – Vascular tissue carries water and nutrients up to the stem and leaves.
-
Store water and carbohydrates – The cortex acts as a reserve supply for when water is scarce.
Stems
-
Support leaves and flowers – Stems carry the weight of heavy foliage and inflorescences.
-
Transport water and nutrients – Vascular bundles run up and down the stem, distributing resources.
-
Store water and carbohydrates – The inner stem stores energy and supplies plants during drought.
-
Enable gas exchange – Stomata allow oxygen, carbon dioxide, and water vapor to pass in and out.
-
Photosynthesize – Chlorophyll in the green stem captures light energy used to produce food.
Caring for Alocasias Using This Knowledge
Now that you understand what’s going on underground and inside those succulent stems, let’s look at some care tips:
-
Water thoroughly – Target water at the roots to satisfy their thirst and replenish stem storage.
-
Avoid overwatering – Drenched roots risk rotting. Allow the top few inches of soil to dry between waterings.
-
Provide bright, indirect light – Low light slows photosynthesis in leaves and stems. But direct sun scorches leaves.
-
Monitor for pests – Check stems and undersides of leaves for signs of sucking insects.
-
Support heavy leaves – Stake stems if needed to prevent damage under the weight of huge leaves.
-
Divide propagations – New plants from rhizome cuttings readily generate their own root and stem systems.
-
Don’t trim roots – Removing healthy roots deprives plants of their water and nutrient lifelines.
Understanding what’s happening underground and inside those gorgeous stems helps us nurture happy, thriving alocasia plants. Knowing the anatomy and functions of these parts takes the mystery out of caring for these tropical beauties.
Featured Articles by Season

Ask Your Gardening Question
If you’re unable to find the information you need, please submit your gardening question here:
Plant Anatomy and Structure
FAQ
What are the roots of Alocasia?
What are the balls in Alocasia roots?
What is the function of Alocasia?
How to grow Alocasia?
Feeding the plant with nitrogen-based fertilizer also boost foliage growth. If you want your Alocasia to look bushy, you can search for corms in the roots and propagate them. Later you can add the newly grown baby plant with the mother plant to make it bushy.
How to divide Alocasia?
By dividing Alocasia, you can get two or three more plants. Just follow the simple steps; Choose some new pots and potting mix. Now carefully remove the mother plant from its pot. Shake off some soil around the root clumps. Now find a clump with roots and corms and gently separate it from the main plant without damaging the roots.
What is the structure of Alocasia?
The complex floral structures of Alocasia species are characterised by the plant’s leaves that are occasionally subtended by a cataphyll with several terminal crowns. The long petioles are either aspirate or glandular while the leave blade is peltate at juvenile which changes to sagittate upon maturity.
Can I water propagate Alocasia cutting?
Yes, we can water propagate Alocasia cutting for many Alocasia species. There are various easy-to-follow steps for water propagation of Alocasia; First of all, remove the fully developed plant from the soil. After taking out the Alocasia plant, lose the root ball and remove all the extra dirt from the roots.