Ich habe einen Master-Abschluss in Gartenbauwissenschaften und bin zudem gelernter Zierpflanzengärtner. Das Thema Anbau lässt mich seit meiner Kindheit einfach nicht los: Egal, ob auf der kleinen Stadtfensterbank oder im großzügigen Garten – Gärtnern muss ich auch in meiner Freizeit immer und überall. Lieblingsobst: Himbeeren Lieblingsgemüse: Brokkoli
From December to February, the amaryllis (Hippeastrum) delights with impressive flowers in white, pink or red. To some, the amaryllis family (Amaryllidaceae), which forms a bulb, may be better known as the Easter lily. This name also fits better than the name “Amaryllis”, which is a historic relic. Indeed, more than 70 species once belonged to the genus Amaryllis, but now they have been assigned to their own genus Hippeastrum. However, the name amaryllis has remained for the winter bloomer in the horticultural community. Once an amaryllis is purchased, with a little care and the right attention at the right time, the bulb can become a blooming companion for several years. Similarly, you can increase the number of amaryllis, which unfold their flowers on the home windowsill from December by propagating them yourself. Propagation by seed is not the only method for amaryllis. We take a closer look at the different propagation options for the amaryllis.
Amaryllis plants are treasured for their stunning trumpet-shaped blooms that appear during the darker winter months. While they can grow and bloom without intervention, pollinating your amaryllis properly can lead to bigger, more vibrant flowers increased seed production, and the ability to create new hybrids. In this comprehensive guide, we’ll walk through everything you need to know about successfully pollinating your amaryllis for optimal growth and yield.
Why Pollinate Amaryllis Plants?
Pollinating amaryllis plants serves a few key purposes
-
Bigger blooms: Pollinated flowers tend to be larger and more vigorous. The transfer of pollen stimulates the production of plant hormones that spur growth.
-
More vibrant colors: Pollinated blooms often showcase richer, more saturated hues. This effect is likely tied to the increased vigor from pollination.
-
Increased seed production: Pollinating amaryllis allows them to set seed pods, resulting in viable seeds that can be collected and planted.
-
Hybrid creation: By cross-pollinating different amaryllis varieties, you can create unique hybrids with new colors and forms.
For indoor gardeners interested in maximizing their amaryllis’ potential, pollinating is an easy way to reap these rewards.
When to Pollinate Amaryllis
Timing is critical when it comes to successfully pollinating amaryllis blooms. You’ll want to pollinate when the flowers are fully open and the reproductive parts are mature.
The best time is generally 1-2 days after the blooms have fully opened. At this stage, the pollen will be ripe and the stigma receptive. Avoid pollinating too early or late, as the pollen and stigma likely won’t be ready.
Pollinating during the peak bloom period gives you the highest chance of effective fertilization. For optimal results, pollinate on a dry, sunny day around midday when pollen viability is highest.
How to Pollinate Amaryllis Plants
Pollinating amaryllis plants is a simple, low-tech process. Here are the basic steps:
Gather Your Materials
You’ll need:
- Amaryllis flowers to pollinate
- Small, soft paintbrush
- Magnifying glass (optional)
- Tweezers (optional)
Sterilize Your Equipment
Before pollinating, sterilize your paintbrush and any other tools you plan to use. Swirl them in rubbing alcohol and allow to fully dry. This prevents disease transfer between flowers.
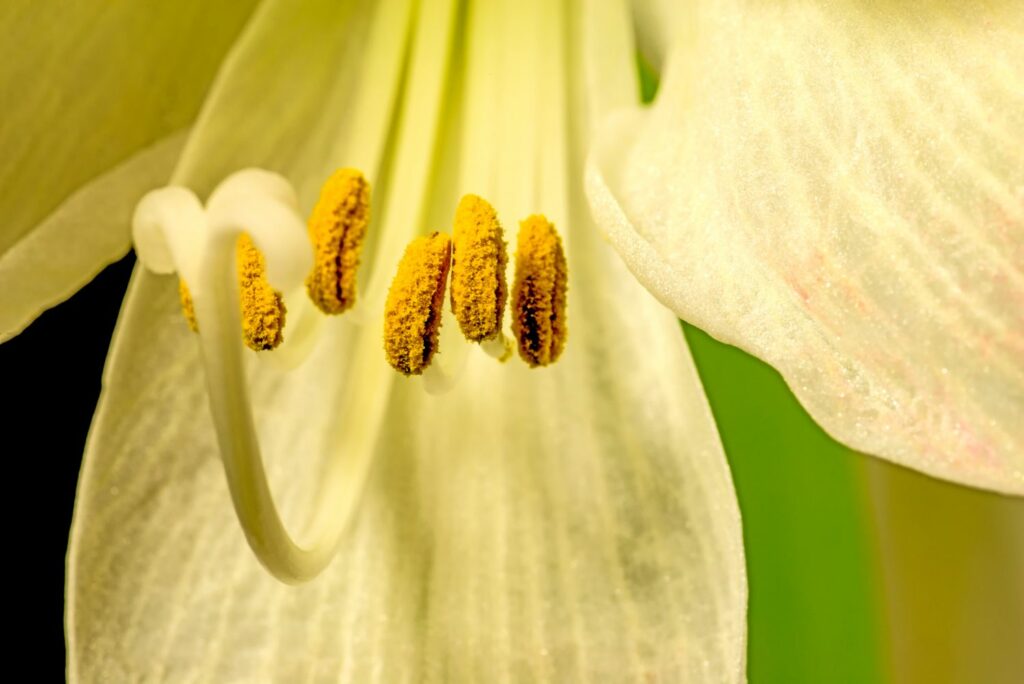
Identify Flower Parts
Use the magnifying glass to closely examine the amaryllis bloom. Locate the stamen (male part) and stigma (female part). The stamen will have a powdery substance on it. The stigma is a sticky knob in the center.
Collect and Transfer Pollen
Use the paintbrush to gently sweep pollen from the stamen. Then, paint this pollen directly onto the stigma. You can also use tweezers to pluck pollen and place it right on the stigma.
Repeat Regularly
Return every day or two to reapply fresh pollen. Repeated pollination improves chances of fertilization. Mark flowers once pollinated so you know which ones to revisit.
Watch for Signs of Success
If pollination succeeded, the flowers will start to wither and the ovary below will swell into a seed pod. Allow pods to fully mature before harvesting seeds.
With some simple tools and attention to detail, you can hand pollinate amaryllis blooms for optimal results. Just be patient and gently transfer pollen over multiple sessions.
Tips for Successful Amaryllis Pollination
Follow these tips to get the most out of hand pollinating your amaryllis:
-
Use freshly opened flowers – Older, fading flowers likely won’t pollinate well. Stick to newly opened blooms.
-
Work in sunny conditions – Bright sun keeps pollen viable longer during pollination. Avoid pollinating in rain, fog, or darkness.
-
alternate flowers – Swap between different amaryllis plants to cross-pollinate. This boosts vigor.
-
support pollinated blooms – Stake up spent flowers so developing seed pods don’t break off prematurely.
-
Let pods mature – Leave seed pods on the plant until they turn brown and brittle before collecting seeds.
-
Sterilize tools – Prevent disease spread by cleaning tools between flowers with alcohol.
-
Check for pod swelling – Pollination worked if the ovary below the flower swells into a rounded seed pod.
-
Label flowers – Mark successfully pollinated blooms to distinguish them from unpollinated ones.
Common Problems When Pollinating Amaryllis
While amaryllis pollination is fairly straightforward, beginners can encounter some common issues. Here are some problems and solutions:
No pollen on stamens – The flower isn’t mature enough. Wait a day or two for viable pollen.
No swelling after pollination – Pollination failed. Try again with fresh pollen on a different flower.
Seed pods fall off – Lack of support. Stake spent blooms so pods can develop.
Small seed pods – Insufficient pollen transfer. Revisit flowers and reapply pollen.
Misshapen pods – Poor pollination or environmental stress. Improve growing conditions.
No seeds in mature pods – Pollen from the same flower was used. Always alternate pollen sources.
With some troubleshooting and repeated attempts, you’ll get the hang of effectively pollinating your prized amaryllis blooms. Don’t get discouraged by initial failures.
Cross-Pollinating Amaryllis Varieties
An exciting opportunity with pollinating amaryllis is the ability to create your own unique hybrids. This involves cross-pollinating different amaryllis varieties to combine their traits.
To cross-pollinate amaryllis plants:
-
Grow at least two different varieties side-by-side
-
Collect pollen from one variety
-
Transfer onto the stigma of the other variety
-
Label flowers and watch for viable seed pods
-
Harvest mature seeds and sow to grow hybrid offspring
The resulting hybrid seeds will grow into plants expressing a blend of both parent plants’ characteristics. This could mean new colors, flower forms, plant sizes, or growth habits. Cross-pollinating is an engaging way to expand your amaryllis collection.
Caring for Pollinated Amaryllis Plants
Once your amaryllis flowers are successfully pollinated, there are a few care tips to support the best seed production:
-
Stake upspent blooms so developing pods don’t snap off
-
Leave pods on the plant until they turn brown and dry
-
Reduce watering once pods form to help them mature
-
Provide ambient sunlight as intense light can damage pods
-
Allow the foliage to die back naturally to fuel next year’s bloom
-
Repot annually in fresh soil to maintain bulb health
With attentive care, your pollinated amaryllis will reward you with a bountiful seed harvest!
Final Thoughts on Pollinating Amaryllis
While amaryllis can bloom without pollination, going the extra mile to hand pollinate opens up new possibilities – from lush, vibrant blooms to exciting cross-bred hybrids. Follow the steps outlined here, troubleshoot any issues, and be patient. With practice, you’ll soon get the hand of maximizing your amaryllis flowers through successful pollination. The stunning results will be well worth the minimal effort required.

Propagating amaryllis from seed
Propagation from the seeds of amaryllis is possible, but very labour-intensive for the amateur gardener. In addition, the characteristics of the offspring may be different from those of the mother plant, due to the genetic splitting of certain traits. Pollination must be done by hand. The pollen-rich anthers are rubbed off on the stigma. This can be done by pollinating the stigma of the same flower (self-fertilisation) or the stigma of another amaryllis plant (cross-fertilisation).
The greatest success in fertilisation through manual pollination is achieved when only the first two flowers of a flower are pollinated and all other flowers are removed. Approximately eight weeks after pollination, the seeds are ripe and can be harvested. They should be sown immediately, as the germination capacity decreases rapidly. After about four weeks, the first seedlings appear. Seedlings are pricked and initially cultivated for 2.5 years, until the second autumn, when they can be prepared for forcing flowering. More about caring for amaryllis after flowering can be found in our article. Here is the procedure if you want to grow amaryllis from seed:
- Hand pollination required
- It is best to pollinate the first two flowers of a bulb, removing the remaining flowers
- Self or cross pollination possible
- Seeds can be harvested after about 8 weeks
- It is best to sow directly, because as storage time increases, the faster the reduction in the germination rate.
- Germination occurs after about 4 weeks
- Prick seedlings, pot and cultivate for 2.5 years.
- In the second autumn, prepare the seedlings for forcing and flowering
- Perfect for all flowering plants in garden beds & pots
- For beautiful blossoms & healthy plant growth
- Peat-free & organic soil: CO2-saving composition
Vegetatively propagating amaryllis
Amaryllis can also be propagated vegetatively. This means that organs are taken from a plant and a new plant is grown from them. This is a clone of the mother plant, so that the offspring have exactly the same characteristics as the mother – a clear advantage compared to generative propagation via seeds. In addition, the process of vegetative propagation is sometimes much less laborious and leads to faster flowering. We take a look at potential vegetative forms of propagation in the case of the amaryllis.

How to:Pollinate Amaryllis/Amaryllis Hand Pollination/Amaryllis Orange Sovereign
FAQ
Should you pollinate your amaryllis?
Can an amaryllis pollinate itself?
How do you get amaryllis to multiply?