File size :51.3 MB (1.6 MB Compressed download) Open your file to the full size using processing software.
Dimensions :3456 x 5184 px | 29.3 x 43.9 cm | 11.5 x 17.3 inches | 300dpi
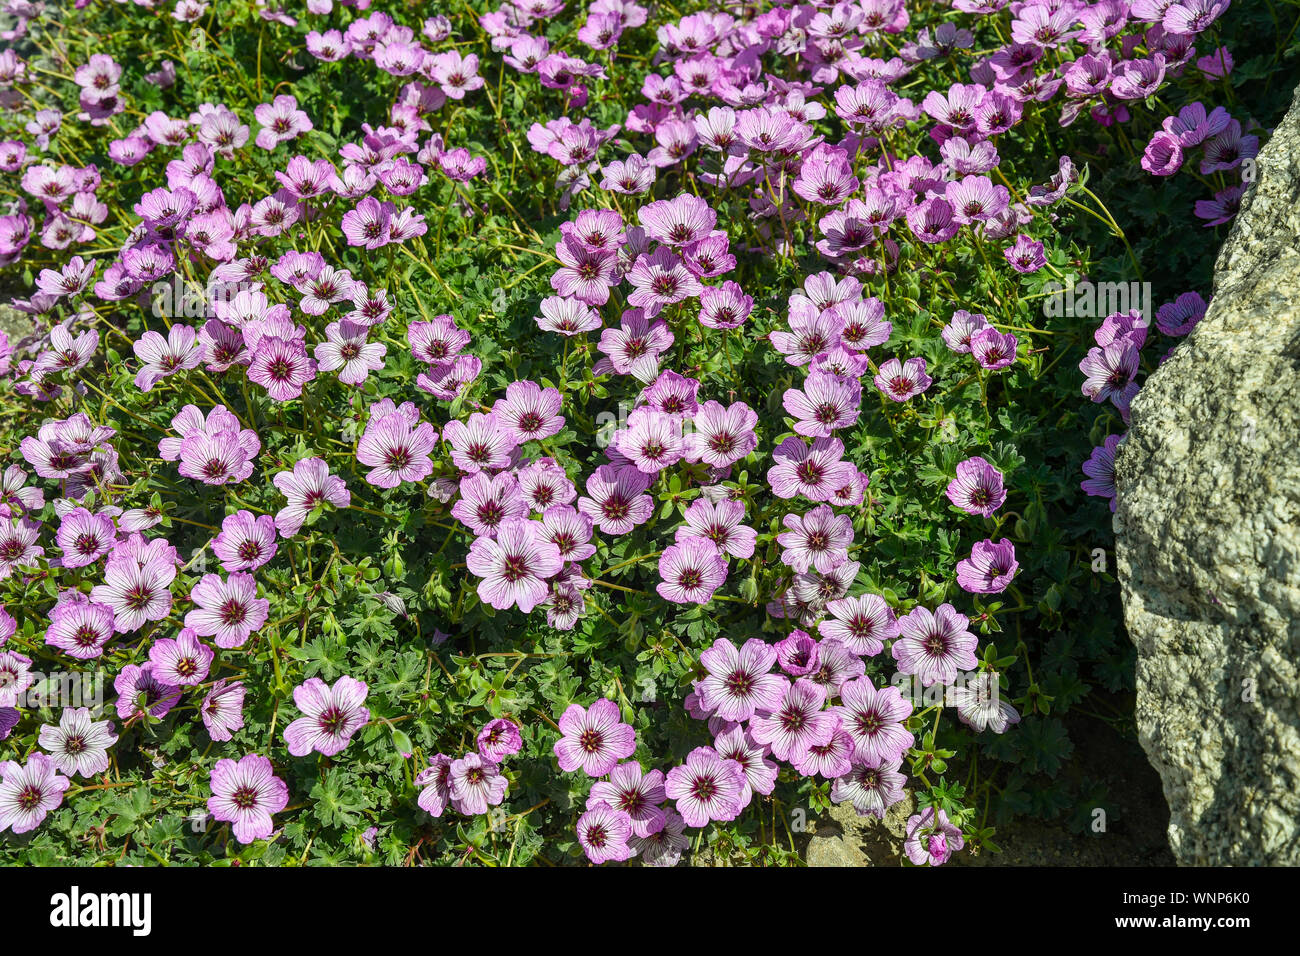
Close up of storks bill flowers of the diminutive alpine, Erodium x variabile Bishops FormTaxes may apply to prices shown.
When is the Best Time to Transplant Alpine Storksbill Flowers? A Complete Guide
Transplanting delicate flowers like alpine storksbill requires careful planning and execution. Choosing the right time to move these charming perennials will give them the best chance to thrive in their new location. In this comprehensive guide, we’ll cover everything you need to know about successfully transplanting alpine storksbill flowers.
What is Alpine Storksbill?
Alpine storksbill (Erodium reichardii) is a petite mountain flower native to the high-altitude regions of Europe. It belongs to the geranium family and is also known by common names like heron’s bill and crane’s bill.
This perennial plant forms dense, fuzzy mounds of fern-like foliage, growing just 3-6 inches tall. From late spring through fall, alpine storksbill produces a continuous display of delicate pink or white saucer-shaped flowers with distinctive seed pods that resemble a stork’s bill.
Despite its dainty appearance, alpine storksbill is quite hardy and can withstand cold temperatures down to zone 7. It thrives in gritty, well-draining soil and does best with at least 6 hours of direct sunlight per day Alpine storksbill works beautifully in rock gardens, borders, containers, and along pathways
When to Transplant Alpine Storksbill
Transplanting perennials like alpine storksbill during their dormant period gives them the best chance to recover and establish roots before active growth resumes.
The ideal time is late winter or early spring, before new growth emerges. In most regions, aim to transplant alpine storksbill between late February and early April.
Transplanting during dormancy reduces stress on the plant. Its energy is focused on developing roots rather than foliage or flowers. Ample time to establish before summer heat allows the plant to thrive in its new spot.
Steps for Transplanting Alpine Storksbill
Follow these key steps for smooth and successful alpine storksbill transplantation:
Choose a Site
Select a transplantation site with conditions similar to its current location – at least 6 hours of direct sun and sharply draining soil enriched with compost.
Prepare Hole
Dig a hole slightly wider and deeper than the root ball. Loosen the soil at the bottom and mix in compost. This gives roots room to spread out and establish.
Lift Plant
Water well a day before. Carefully dig around the clump, keeping the root ball intact. Gently lift out of the ground using a spade or garden fork.
Plant at Proper Depth
Place in the hole at the same depth as before. The crown where stems emerge should sit just above soil level. Refill the hole halfway and firm the soil gently around the base.
Water Well
Water thoroughly after planting to eliminate air pockets. Keep soil moist but not saturated while roots establish.
Provide Care
Apply mulch around the plant to retain moisture and add organic matter as it breaks down. Avoid fertilizer immediately after transplanting. Monitor water needs and watch for signs of stress.
Divide Overgrown Plants
Mature alpine storksbill plants can be divided every 2-3 years. Carefully dig up and separate the root clumps, replanting the divisions promptly.
Transplanting Tips for Healthy Alpine Storksbill Flowers
Here are some handy tips to ensure your transplanted alpine storksbill flowers adjust well and thrive:
-
Water transplants regularly until established, especially during dry or hot weather.
-
Add organic mulch like wood chips or compost around plants to maintain soil moisture and temperature.
-
Avoid over-fertilizing after transplanting, as it can cause stress. Resume regular feeding next season.
-
Monitor for signs of transplant shock like wilting. Adjust watering and care as needed.
-
Keep an eye out for pests like aphids or slugs which may attack stressed plants. Take control measures if populations increase.
-
Consider using supports or cages to keep flower stems upright if transplants start to flop over.
-
Divide rootbound plants every few years to rejuvenate and control spread. Discard any diseased portions before replanting.
-
Take stem cuttings in spring or summer to propagate extra transplants as insurance.
Follow Up Care After Transplanting
Be sure to monitor transplanted alpine storksbill closely and care for them properly after moving to prevent shock. Here are some important aftercare tips:
-
Provide afternoon shade for the first few days after transplanting. Dappled sun reduces stress on newly moved plants.
-
Check soil moisture frequently and water transplants as needed until the root system is re-established. Avoid saturated soil.
-
Fertilize conservatively with a balanced organic fertilizer, avoiding high nitrogen products that spur excessive top growth.
-
Monitor for signs of stress like wilting, yellowing leaves, or stunted growth. Respond quickly to prevent decline.
-
Remove spent flower stems to encourage continuous blooming. Deadheading directs the plant’s energy towards new flower production.
-
Apply an organic mulch layer to help retain soil moisture and reduce weed competition while new roots develop.
-
Consider using supports or plant cages to keep flower stems upright if transplants are struggling.
By taking a bit of extra care while alpine storksbill establishes after transplanting, your efforts will be rewarded with a healthy, floriferous plant.
Alpine Storksbill Propagation Tips
In addition to transplanting mature plants, alpine storksbill can also be easily propagated by seed or cuttings for more specimens.
To grow alpine storksbill from seed, allow seed pods to mature and dry on the plant. Collect the tiny dust-like seeds and sow directly outdoors in fall. Keep the area moist until germination. Transplant seedlings when they are a few inches tall.
For cuttings, use a sharp, sterile knife to take 3-4 inch stem cuttings in spring or summer. Remove lower leaves, dip cut end in rooting hormone, and insert into a moist potting mix. Keep cuttings warm and humid while new roots form. Once rooted, transplant into the garden.
How to Divide Alpine Storksbill
Every few years, mature alpine storksbill plants will outgrow their space and benefit from division. Follow these steps:
-
Water plants well a day before dividing.
-
Carefully dig up the entire clump using a garden fork, keeping as much of the root system intact as possible.
-
Shake off excess soil and use your hands to gently tease the root mass apart into smaller sections.
-
Divide with a sharp, sterile knife or pruners if roots are heavily tangled. Discard any damaged or diseased portions.
-
Replant divisions promptly into prepared garden soil at the original depth. Water in well.
-
Care for new divisions as you would a newly transplanted plant until the root system is re-established. Enjoy your expanded alpine storksbill collection!
Conclusion
Transplanting alpine storksbill successfully just takes a bit of preparation and follow up care. By transplanting during the dormant season, providing ideal growing conditions, and attending to aftercare needs, you can move these charming rock garden plants without losing a step.
Soon your transplanted alpine storksbill will be happily settled into their new location, rewarding you with their delightful blooms. Just be sure to time it right, handle with care, and give them TLC as they establish roots in their new garden home.
k
When Is The Best Time To Transplant Irises?
FAQ
What month do you transplant flowers?
What is the best time to transplant?
What is the best time to transplant ferns?
What flowers do not like to be transplanted?
When is the best time to transplant a perennial plant?
The best time to transplant perennial flowers and shrubs is when the plant is dormant, as this gives the plant time to settle into the new soil before active growth begins. You can also move plants in the spring or summer after any new growth has established itself, but be sure to follow these important tips for the best success:
Should I transplant my plants in summer?
Summer is not usually recommended for any planting. The heat and lack of water can set your plants up for transplant shock, which can result in losing your plant if you are not careful. That said, if you have a cool stretch or maybe a rainier summer than usual, you can give transplanting a try.
Should you transplant a plant in the fall?
Fall transplants can benefit from the months of cooler, moister weather ahead. Thanks to autumn rains, the plant’s roots get a chance to grow before summer’s heat dries up the earth. Strong roots anchor a new transplant into its new location and help stock up on needed nutrients.
When should I transplant my Garden?
Transplanting times for gardeners need to take root pruning into account. Generally, it is best to root prune in fall. If you root prune in fall, you should transplant in spring, giving the new roots a chance to get started. If you root prune in spring, transplant in fall.